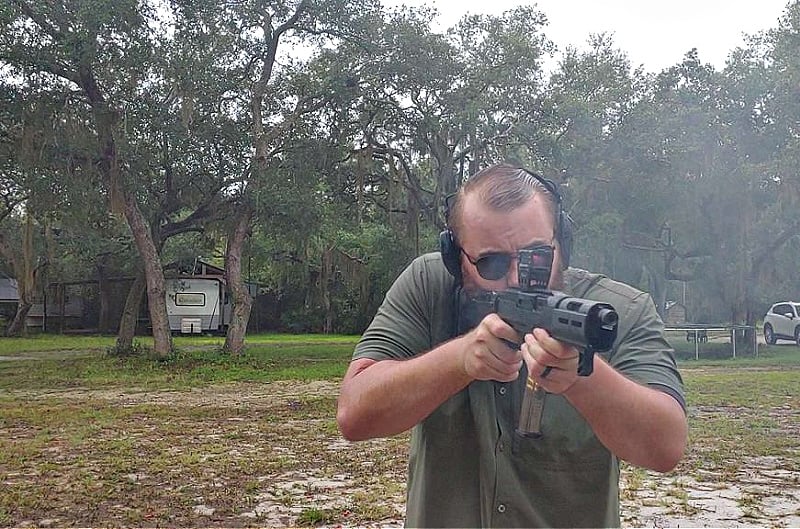
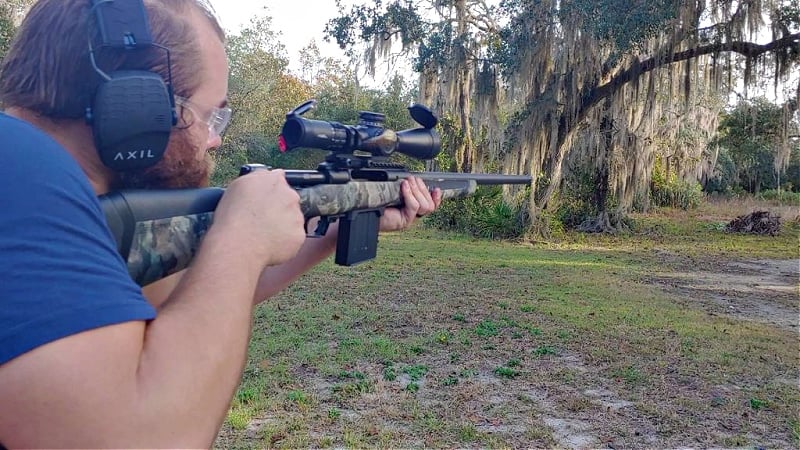
Electronic hearing protection runs the gamut price range-wise. You can find a good set of earmuffs priced anywhere from tens of dollars to several hundred dollars. This massive price difference makes it intimidating at times. Many cheap things in the gun world often suck, so how does ear protection do? Well, today, it’s all about saving money, and we are doing so with the Walkers Razor Slim ear muffs.
These cheap headphones cost around fifty bucks, so they land squarely in that budget category for earmuffs. With that said, are they worth a damn? Protecting your hearing is pretty dang important, so it’s worth saving some bucks over. Let’s dive into it.
The Importance of Electronic Hearing Protection
The Walker’s Razor Slim earmuffs provide budget-grade electronic hearing protection. You might be thinking that a set of normal, non-electronic earmuffs are even cheaper. True, but electronic hearing protection can be an invaluable tool.
Electric ear protection allows you to maintain a high level of situational awareness. That’s inherently valuable when it comes to dealing with firearms. Being able to hear range commands, ceasefires, and more isn’t just a convenience but a potential lifesaver in a bad situation.
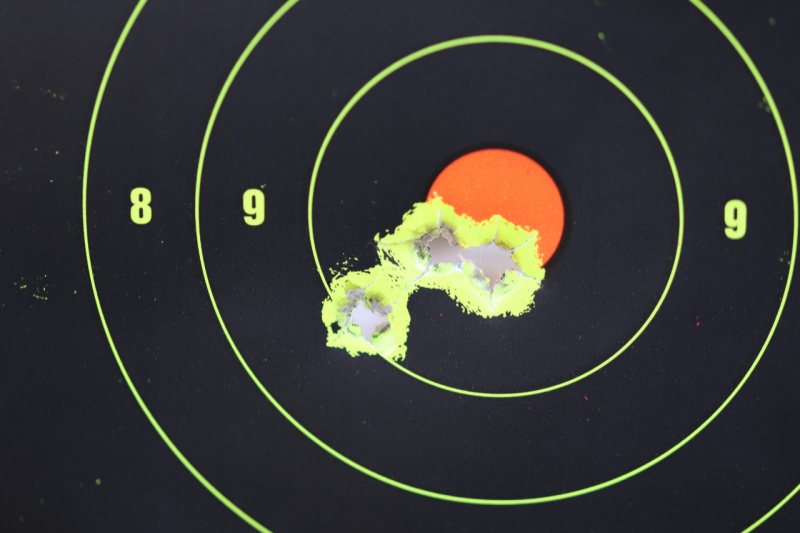
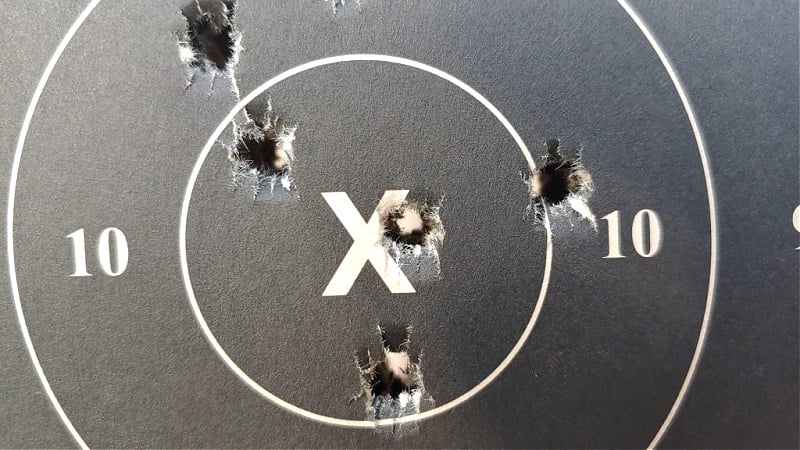
The Walkers Razor does a great job at reducing noise, including the noise of the 500 Auto Max.
If you take classes, you are paying for an instructor to teach. Teaching involves speaking, and if you are paying an instructor to teach, you better be able to hear what they have to say. A set of electronic ear protection allows you to hear commands, instructions, and more on the fly when a half dozen other students are shooting around you.
Electronic hearing protection also makes you a better competitive shooter. Again, you are dealing with range commands, matches working on strict timelines, and your ability to win depends on your ability to hear that BEEP.
These have a muff design that fully encompasses your ears and provides a high level of hearing protection to the individual user. Muffs beat plugs on the protection rating, but earplugs typically beat muff comfort-wise.
Shotguns aren’t an issue either!
The Walker’s Razor Slim ear muffs do provide a noise reduction rating of 23 decibels. That greatly lowers the sound of gunfire to a hearing-safe level for the vast majority of firearms. Admittedly, if you take a .308 caliber pistol with a muzzle brake to the range, you might want to double up. For everything else, the Walker’s will provide a high level of protection to keep your ears from gaining that loud, high-pitched ring that causes you to require a fan for white noise so you can sleep at night.
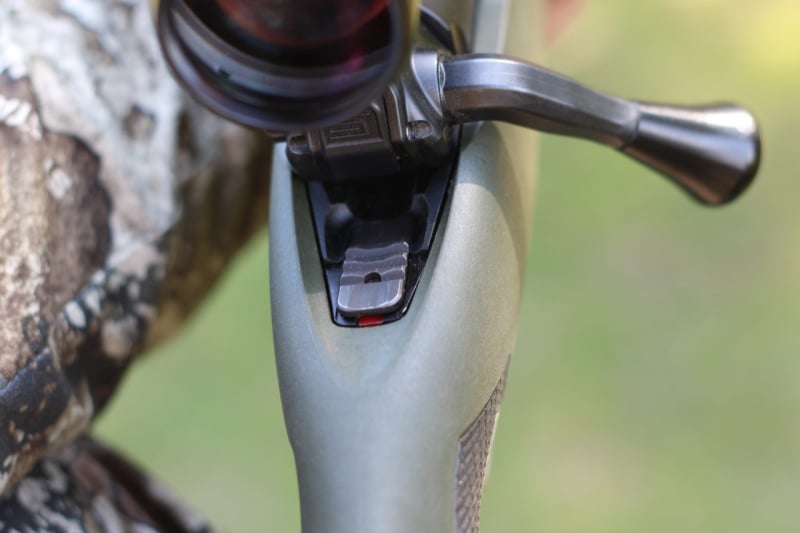
The Walker’s Razor earmuffs have a single control. It’s a knob that both turns the earmuffs on and adjusts the volume as necessary. You do get a 3.5mm audio jack that allows you to plug into an external audio device, but that does kill some of your attention span and adds a second layer of volume control to your earmuffs.
The Comfort Level
Earmuffs tend to be less comfy than earplugs, but the Walker’s Razor muffs aren’t exactly a pain in the head. A set of padded cups— well, they cup your ear and are a very comfy set of muffs. They encompass your ear entirely, and a soft polymer coats the outside of the muffs. This polymer coating provides a level of protection to the earmuffs.
Loud guns need good ear pro and the Walkers are a great go-to, especially for the money.
This prevents water absorption and generally gives the muff part a much longer lifespan. The cups are thick, well-padded, and provide a high level of comfort and the heavily padded headband is surprisingly comfortable and doesn’t rub my head raw.
I got a big head, guys, and guess what? A lot of muffs pinch my head. These don’t. For my fellow big-headed kings, the Walker’s Razor earmuffs give us a pinch-free experience.
Wear and Use
The slim nature of the Razor earmuffs makes them a fair bit more comfortable when using a rifle stock. You can rest your head against the stock and get a decent cheek weld when firing and handling a rifle. It’s not perfect, and plugs will get you tighter on the stock, but it’s better than a lot of other earmuffs I’ve used in the past.
They do provide excellent protection, even at indoor ranges. I’ve never walked away with ringing ears, even after using rifles indoors. At SHOT, one year, we were handling a lot of binary trigger-equipped rifles inside a small range, and I didn’t so much as develop a flinch.
Holy crap does it hit hard…in both directions.
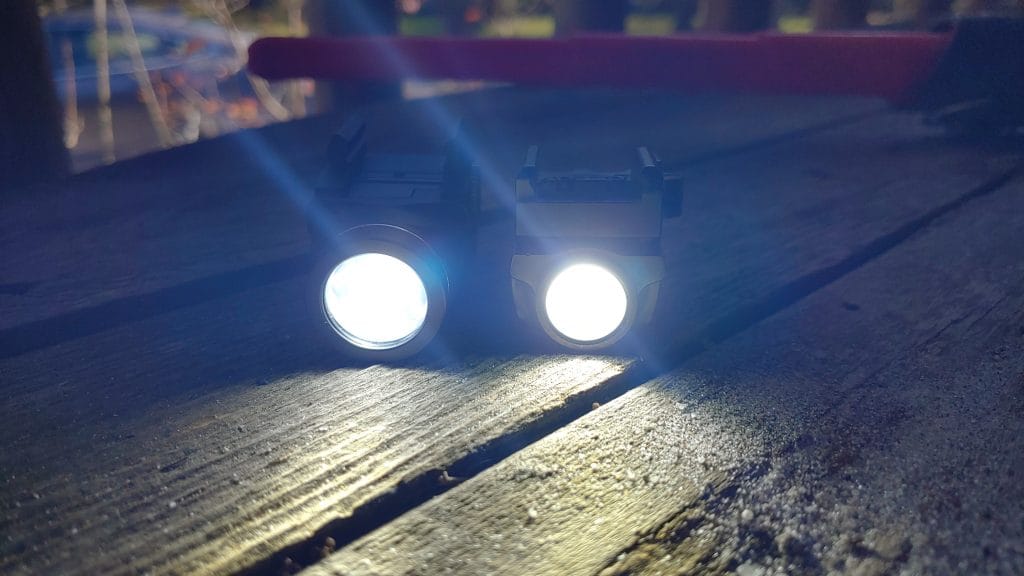
As electronic ear muffs, the Razor Slims have a set of mics that allow you to hear external audio. If a noise reaches above a certain threshold, the device will automatically shut the noise off. It’s faster than we can perceive and occurs within .02 of a second.
The budget nature of the Walker’s Razor slims does mean you don’t get the best audio quality. Don’t get me wrong. Everything is audible and understandable. I have no problems hearing people speaking, talking, taking instruction from a tower, and whatever else comes my way. However, I’ve experienced clearer audio with other electronic hearing protection. Keep in mind those muffs cost at least as twice as much as the Walker’s Razor muffs.
Hearing Around
The mics in the Walkers Razor Slim earmuffs are omnidirectional. This does help you find the source of the noise in most cases. Omnidirectional can only go so far, but it’s better than the old school earmuffs with a single mic and surprising for a budget friend set of electronic earmuffs.
A short, braked 308 was still comfy with the Walkers.
The Walker’s Razor slim earmuffs work wonderfully for the price point. These kinds of muffs have two jobs. First, to protect your hearing. Second, to provide you with enhanced situational awareness. On those two fronts, the Walker’s Razor Slim earmuffs excel. On top of that, they provide a surprising level of comfort at the same time.
Color me impressed. Actually, I was impressed enough to purchase two pairs. They serve as my backup earmuffs and my spares when I take friends and family shooting. For the price point, they offer you an entry-level set of earmuffs that are well worth the investment, in both your ears and situational awareness.
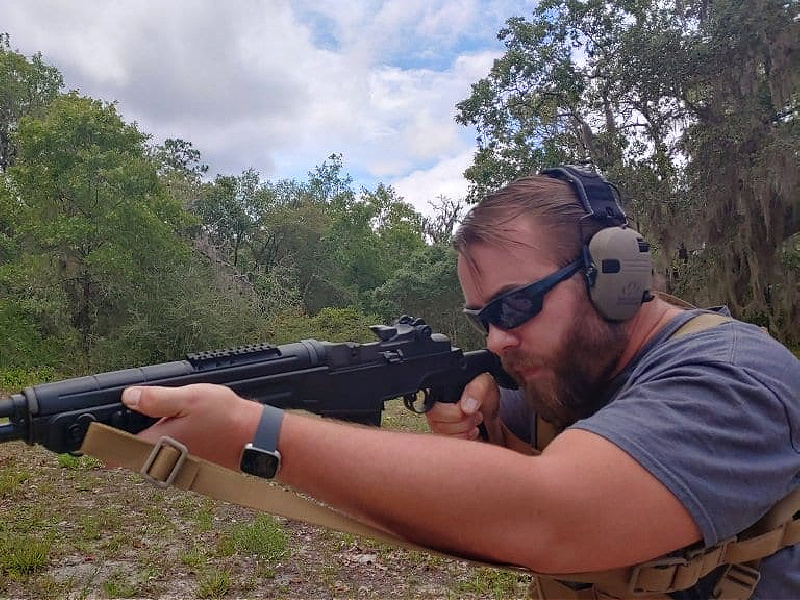
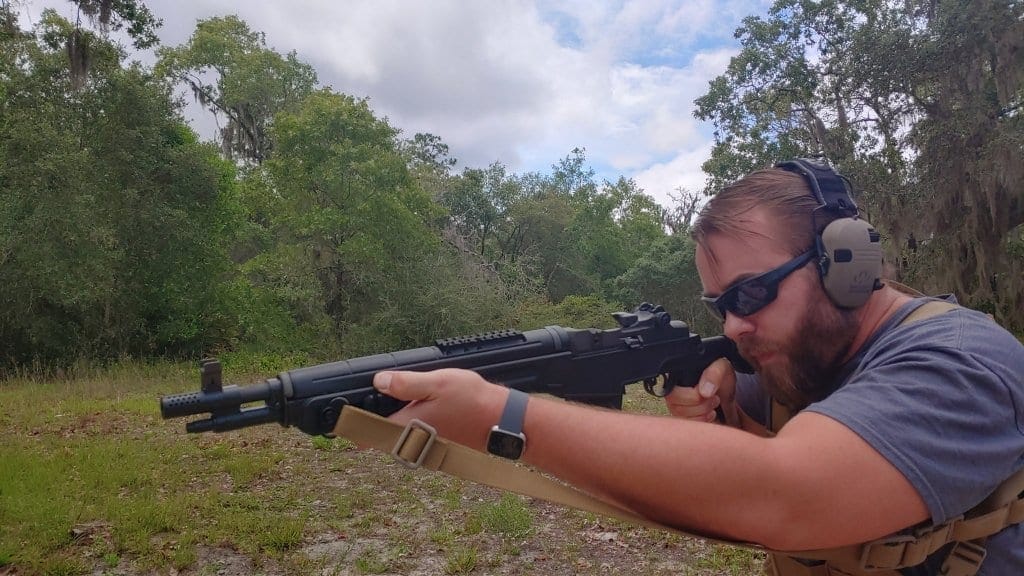
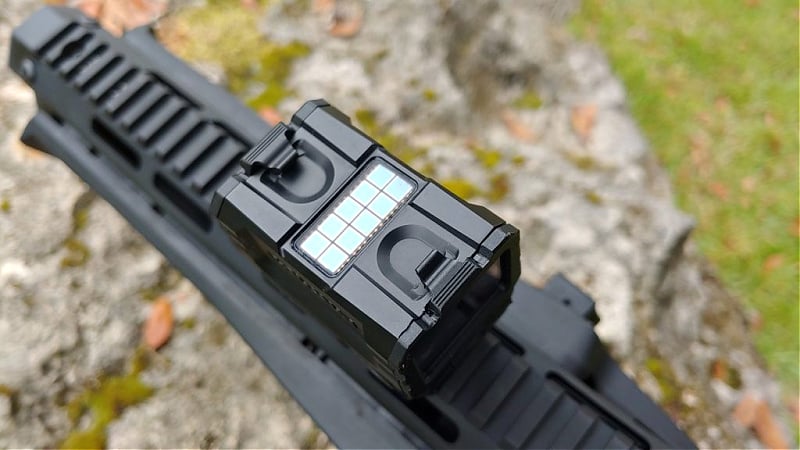
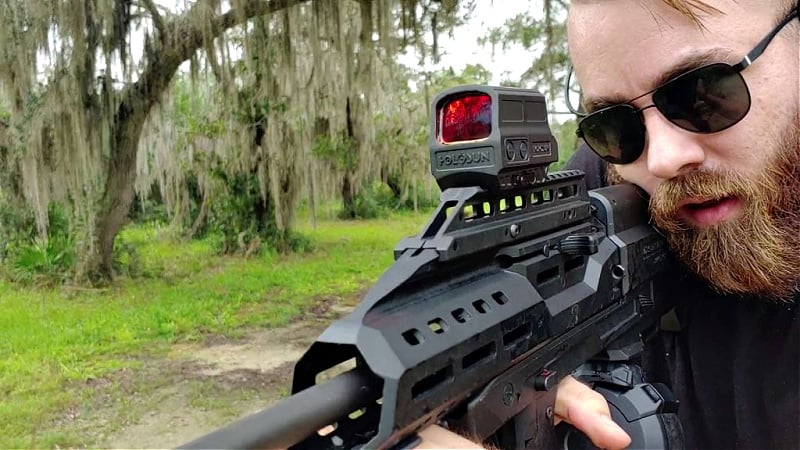
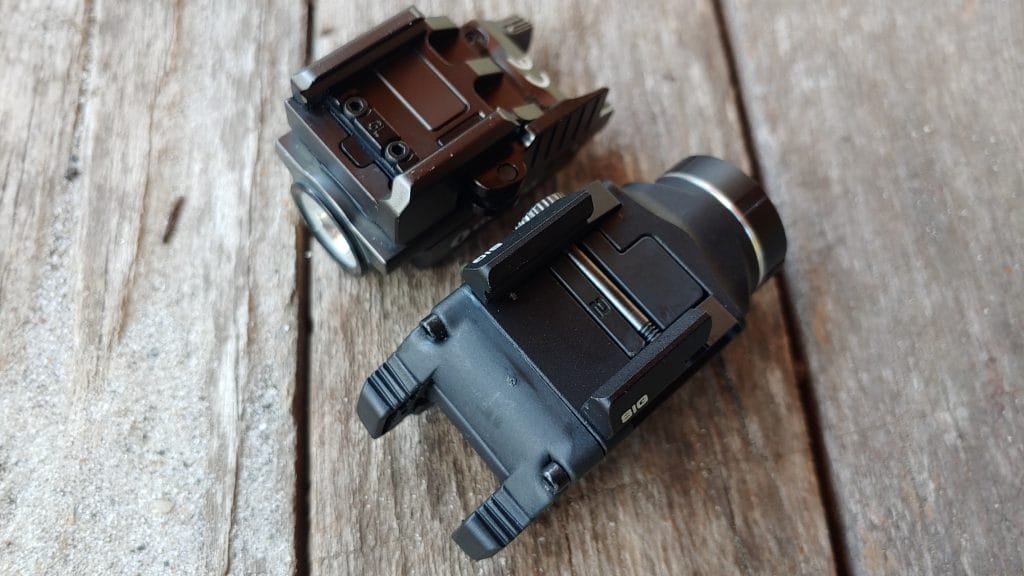
Holosun has gained a great reputation in the last few years. They make solid optics, and they’ve earned their place. However, their latest optic, the AEMS, was the first I saw that made people excited. People waited for the drop patiently, as did I. I got my AEMS last month and have been chucking lead downrange over the last few weeks.
AEMS stands for Advanced Enclosed Micro Sight and is Holosuns attempt at making an efficient red dot sight. By efficient, I mean the optic tries to combine the smallest size possible with the largest field of view possible. Let’s see if the hype was worth it.
Specifications and Features
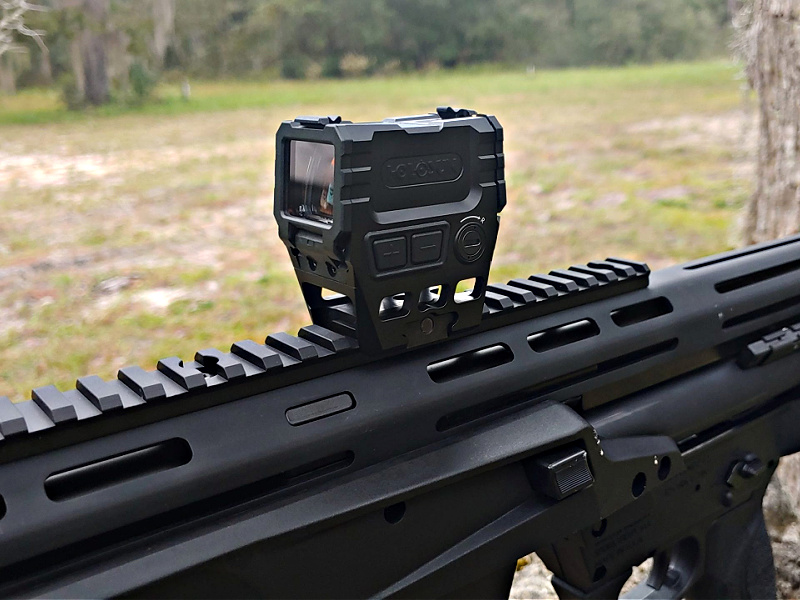
This optic is all about staying nice and small, and the AEMS does a great job of keeping things small. At 2.2 inches long, 1.4 inches wide, and 2.59 inches tall, the AEMS is about 10% shorter than most micro-optics.
It’s surprisingly small and weighs a nice 3.9 ounces. The AEMS certainly meets the goal of being small and light, and I appreciate that. Even though it’s small, the window is nice and large at 1.1 inches x .87 inches.
Wide FOV combined with an awesome reticle? Hell yeah!
Holosun chose a CR2032 battery to power the optic. Battery life exceeds 50,000 hours using the 2 MOA dot and at a moderate setting. Like most modern Holosun optics, the AEMS comes with a solar backup system that can reinforce the battery should it die. That solar panel runs off both the sun and artificial light, so it works indoors.
With the AEMS, we get eight daylight settings and four-night vision settings. That’s a fair amount of night vision settings and plenty of daylight settings. The AEMS has an automatic brightness adjustment setting and a manual setting. I prefer manual 100% of the time. Users can choose between one of three optics and can do so on the fly.
The solar panel provides a backup source of power in case the battery dies.
The optics include the 2 MOA dot, the 65 MOA circle, and a combination 2 MOA dot and 65 MOA circle. Options matter and I tend to prefer the 2 MOA and 65 MOA dot, but we’ll talk more about that later.
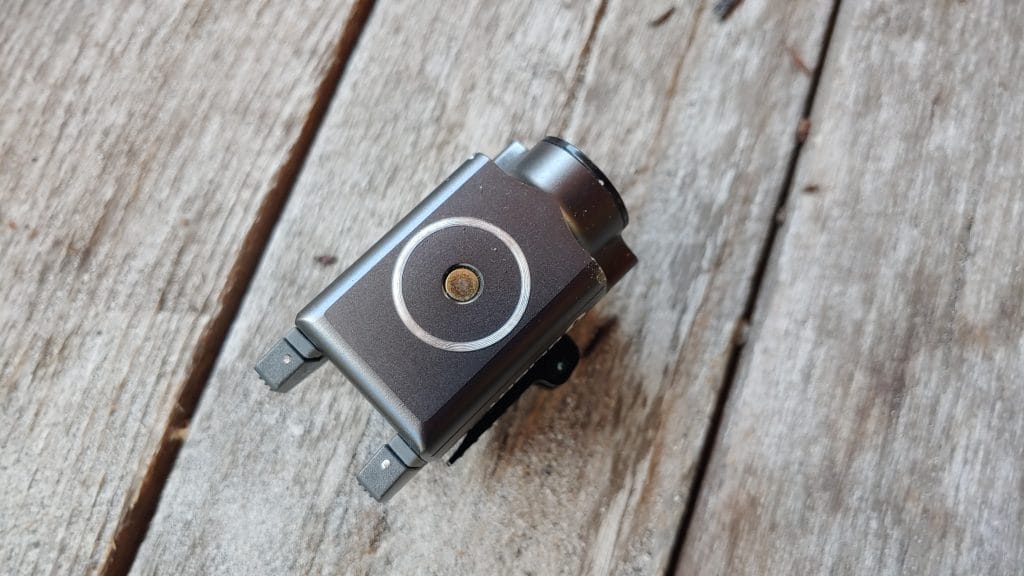
On the Outside of the AEMS
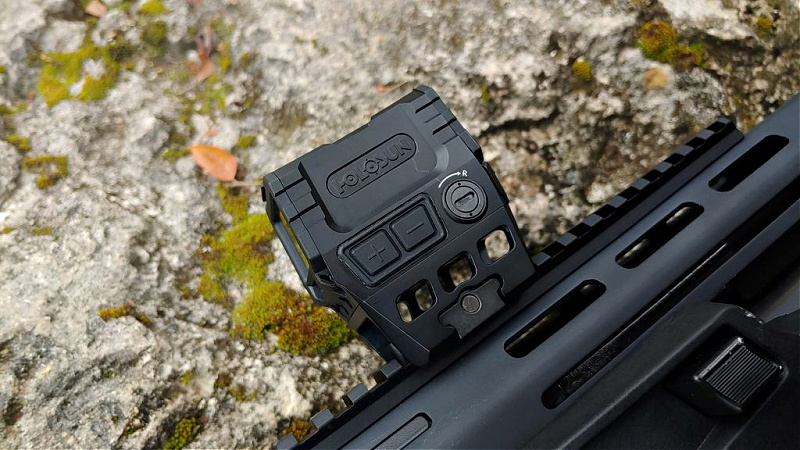
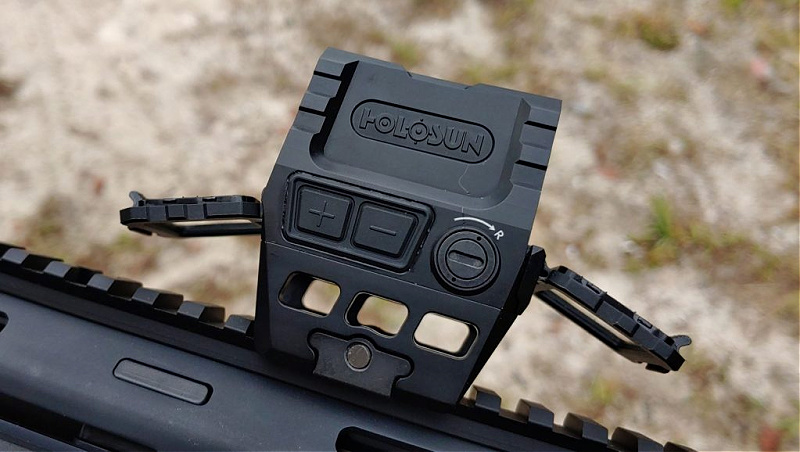
On the outside, the first thing you see is the small top-mounted solar panel. It’s accessible and will always reach above you. You also get two massive buttons that control the optic. The buttons not only adjust the brightness level, but turn the optic on and off, swaps reticles, and turn the automatic mode on or off. The various button combinations are easy to use and make controlling the AEMS simple.
These two buttons do all the work.
The buttons deliver nice tactile feedback and take a dedicated press to activate. They are quite nice, and even on the fly, you can make adjustments. Another big attention-getter is the presence of two lens covers. These disposable, user-replaceable lens covers act as another layer of protection for the optic.
Did I mention that these lens covers are see-through? They are super clear, and I barely noticed them and only popped them down to do a clarity check. With the lenses in place, they are superbly clear and perfectly useable. I’d imagine the only reason to pop them off was to use the AEMS with a magnifier to ensure everything is super clear.
The lens covers are clear, removable, and replaceable.
I have bad news and good news regarding the mount. The bad news is that the mount is proprietary, and there isn’t an aftermarket available for it. The good news is that Holosun plans to release various height mounts for a variety of different weapon platforms.
On the Inside of the AEMS
As I mentioned, even with the lens covers, the optic is surprisingly clear. Without the lenses, the AEMS is super clear and provides a brilliant and crisp picture. There is a slight blue tint, and that is it.
The reticles are also super clear and crisp. They don’t drag or flicker when moved swiftly. I like the 65 MOA and 2 MOA dot. However, every reticle is super clear and easy to see and use.
Quite an intimidating view.
The optic utilizes the same shake awake system that Holosun made famous. When the optic is left undisturbed for a certain amount of time, it will automatically shut off. When the optic detects movement, it springs to life and returns to the last used brightness setting. You can set the auto shut off for an hour, for 12 hours, or turn it completely off.
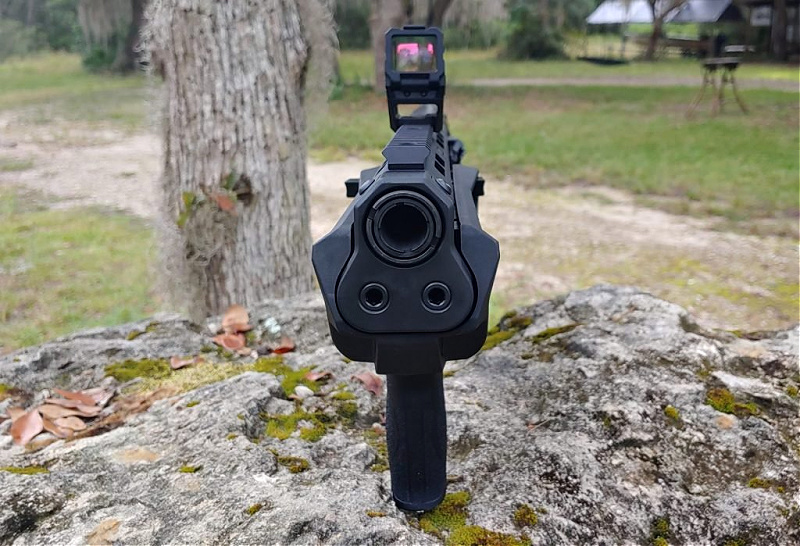
To The Range
I mounted and zeroed the AEMS to the M&P 12 with some basic buckshot loads. The turrets are very nice. They are uncapped, recessed turrets that require a flat head tool to make adjustments. The adjustments are .5 MOA per click, and the clicks are both audible and tactile. Zeroing was quick, and I was dumping buckshot into the chest and heads of targets rapidly.
From subgun to shotgun it works incredibly well.
A 12 gauge seemed to be a great testing platform to hit the gun with some rough recoil. I cycled the pump gun quite quickly, and the AEMS didn’t care. It didn’t flutter or flicker when faced with the hefty recoil of slugs and full-powered buckshot. I also liked using the big 65 MOA ring for shotguns. Whatever is in that ring feels the sting of buckshot at 20 yards.
That promised wide field of view is very present, and it’s a nice touch, also quite handy for a shotgun. The thin build of this square optic keeps your peripheral vision open. The field of view is nearly identical to the HS512C, and that’s a much bigger optic. The smaller size and wide field of view make it the perfect choice for mounting to small guns, and I did just that.
The AEMS on a shotgun works extremely well.
I popped the AEMS onto the Ruger PC Charger and went wild with some 9mm ammunition. I delivered unto my targets plenty of lead. The wide field of view and small size gives you a very capable optic for little subguns like the Charger. In fact, the AEMS might find a permanent home on my Aero Precision EPC and for my future USPSA PCC matches.
The AEMS Vs. The HS512C
I mentioned the HS512C, and it’s because the HS512C is another enclosed emitter optic from Holosun. It is a full-sized optic, and I thought it would be a worthy comparison to the AEMS. The HS512C has a slightly wider window at .91 x 1.26 inches.
Shotgun go BOOM!
However, the rest of the optic is considerably larger as well. The slightly smaller window of the AEMS (1.1 x .87 inches) is literally fractionally smaller. However, you get an optic that weighs three ounces and is only 2.2 inches long, 1.4 inches wide, and 2.59 inches tall versus the HS512C’s 3.35 inches long, 1.63 inches wide, and 2.27 inches tall.
To be fair, the AEMS is taller, but it utilizes a taller lower 1/3rd mount, and the HS512C uses an absolute co-witness mount. Speaking of mounts, the HS512C does not have interchangeable mounts. You get the one you get, while the AEMS can be swapped around for different guns.
The HS512C is a bit bigger.
The only real advantage the HS512C offers is being slightly cheaper. Other than that, I’m betting the AEMS replaces the HS512C in the next year or so.
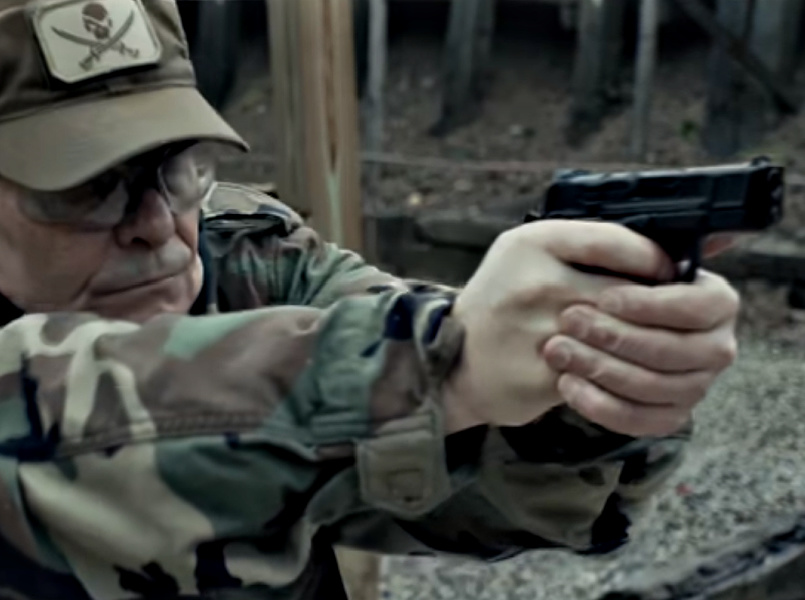
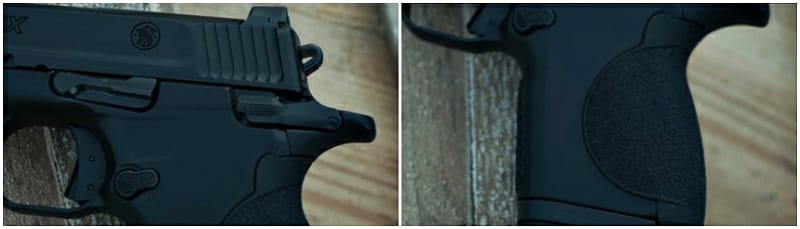
With SHOT Show 2022 approaching fast, new product releases are all the rage. Smith & Wesson is near the front of the pack with their new CSX subcompact pistol. Aimed squarely at the concealed carry crowd, the Smith & Wesson CSX looks to challenge the Sig Sauer P365XL and the Glock 48X for market share. That’s some stiff competition, so Smith & Wesson, not content to just toss out a clone of those guns, or a revamped M&P Shield, has gone back to a tried-and-true design that should appeal to the gun community.
In the video above, Allen from Olde English Outfitters gives us a quick rundown of the CSX’s features and his first impressions of the gun. The first thing Allen points out is that the CSX is a 1911-style single action only hammer fired gun. Chambered in 9mm Luger, the CSX, as noted above, is the latest in the trend of small guns with higher capacity. Because of its styling, Allen places the gun as the successor to the Colt Government .380, the Sig Sauer 238 Series, the Springfield Armory 911 Series, and the Kimber Micro 9 Series.
Allen from Olde English Outfitters gives us his first impressions of the new Smith & Wesson CSX subcompact pistol.
Here’s a quick look at the CSX’s specifications:
Caliber: 9mm Luger 9mm
Hammer fired single action only
Overall length: 6.1 inches
Barrel length: 3.1 inches
Thickness: 1.12 inches
Height: 4.6 inches
Weight: 19.5 ounces
Capacity 10+1 or 12+1
Barrel and slide material: Armornite finished stainless steel
Frame material: Aluminum alloy
MSRP: $609.00 per S&W website
The new S&W CSX looks like a slick little carry gun.
Allen estimates the price at around $550.00 and, with the listed MSRP of $609.00, he’s probably pretty close on that. The barrel and slide feature Smith & Wesson’s Armornite finish so, as Allen says, they should be very durable and rust-resistant. The CSX is, unusually for a small carry gun, all-metal, making it a bit heavier than other guns of its size. But Allen says, and I agree, that extra weight is okay, as it probably helps a bit with recoil and, at 19.5 ounces, still isn’t heavy by any means.
The CSX features a low-profile slide release, 1911 style thumb safety, and a nice grip
The CSX has lots of nice features as well. As Allen says, “This is a lot of gun.” Here’s a list of those features:
Adjustable metal front and rear sights with the rear sight being squared off
Glare reducing texture on the top of the slide
Front and rear cocking serrations
Small cocking ears on the rear of the slide, similar to the M&P Shield EZ
Ambidextrous 1911-style frame-mounted thumb safety
Low profile slide release
Reversible mag release button
Interchangeable backstrap
A nice long beavertail
Allen was impressed by how the CSX handled.
The metal sights are nice, especially with the square profile rear sight. They should be very durable. I really like the inclusion of the cocking ears. As I get older, I wish more guns had those. The reversible mag release is actually a different part that comes with the gun. You just switch them out if you want. The gun ships with one extra backstrap that requires a tool to depress the plunger holding it on the grip. The tool is provided. It looks pretty stiff but, realistically, how often are you going to the change the backstrap? The beavertail is plenty long to guard against hammer and slide bite.
The CSX has a nice long beavertail.
There are a few things on the downside, but they’re minor. First, there’s no front rail. Personally, I don’t generally hang stuff from the front of guns this small, so it’s no big deal to me. But some might, so it would be nice to have the option. Second, the 12-round mag extends further from the grip, so it has a sleeve to fit in the space between the bottom of the grip and the mag floorplate. The sleeve isn’t anchored, and it slides up and down the mag, which Allen didn’t like. But he took it off with no ill effects and suggests that S&W anchor it in the future. There’s no loaded chamber indicator, though there is an inspection hole on top for press checks. No big deal to me, but it might be for some. Finally, the CSX is not optics-ready. Maybe that’s a thing for you, maybe not.
The CSX comes with an extra backstrap and the tool to change it.
The trigger is described as being “pretty flat” with an integral safety blade for the internal firing pin lock. Allen said the trigger was a little gritty at first but got better as he fired it more. The trigger pull is light, as you’d expect from a single action gun.
Overall, Allen was very impressed by the CSX. He says, “It sits in the hand really well. Doesn’t bounce around much.” The recoil was mild for a gun this size and it shot very well. He didn’t put it on paper but expects it to group well. “They’ve done a good job on this,” he says. “If you like the single action gun…hammer fired pistol, this is a good thing to look at. It packs a lot into a pretty small package. We’re going to tip our hats to Smith & Wesson on this.”
The Smith & Wesson CSX adds a new dimension to the small, higher-capacity gun market.
It’s pretty standard for companies to jump into trends to sell some guns while things are hot, like the small, higher capacity carry guns are right now. But it looks like S&W has not only jumped in but offered something that adds to what’s out there instead of just copying it. It’s probably a good move and, as we all know, it’s nice to have options.
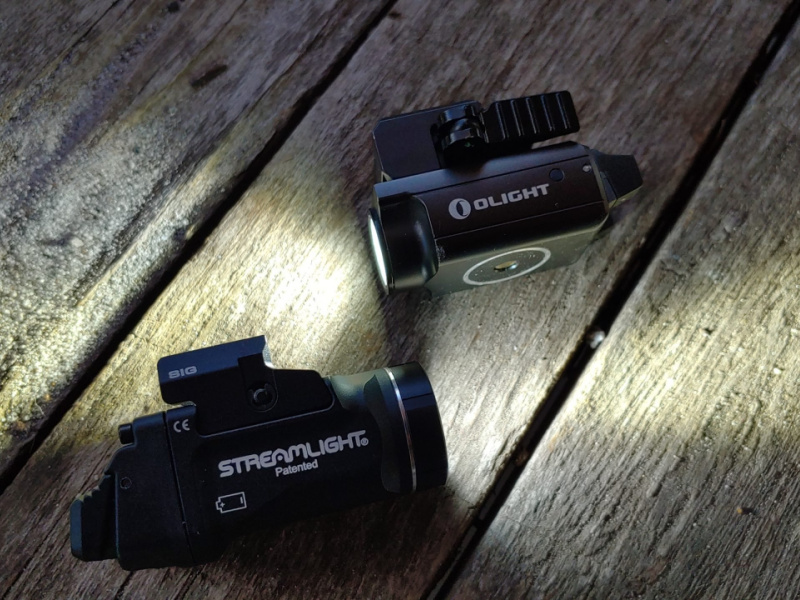
Concealed carry guns have reached an interesting intersection of size, capacity, and capability. It feels like we’ve reached the perfect size and capacity compromise with guns like the P365, the Hellcat, the Ruger Max 9, and the like. These little micro compacts pack at least ten rounds of 9mm, are often optic-compatible, and even come with some form of a rail system. Attaching a light to these guns is possible, but little lights are rare. Two of the main competitors on the market are Olight and Streamlight. Today we are doing a little head-to-head competition with the Olight Mini Valkyrie 2 vs. the Streamlight TLR 7 Sub.
So who comes out on top?
Olight was first and the scene with the Mini Valkyrie series being designed specifically for little guns. Streamlight followed up last year with a mini light of their own. Our Mini Valkyrie 2 vs. Streamlight TLR 7 Sub showdown will allow us to examine their size and weight, their mounting options, their raw power, and even their batteries and battery life.
Since these are small lights made for small guns, let’s start with the general dimensions of these lights. They gotta be small to be effective, right?
The Mini Valkyrie 2 Vs. The TLR 7 Sub A Battle of Sizes
Size matters. Well, power matters more, but size does matter when it comes to a light on a concealed carry gun. Especially if that light is designed for a small concealed carry gun. Size and also weight are critical factors in choosing an accessory, and we plan to do a healthy comparison between these two lights.
Size-wise they ain’t far apart.
The Mini Valkyrie 2 does pull in a win in the length department. It’s only 2/07 inches long versus the TLR 7 Sub’s 2.51-inch length. Yet, the Streamlight TLR 7 Sub is a lighter and skinnier light. It’s a tall supermodel, and the Mini Valkyrie is a squat little dude that doesn’t stand a chance. The TLR 7 Sub weighs 2.39 ounces vs. the Valkyrie’s 2.57 ounces. The Valkyrie is also 1.26 inches wide, whereas the TLR 7 Sub is 1.16 inches wide.
The Sub might be a little longer, but it scores high in the other departments when it comes down to size in our Mini Valkyrie 2 Vs. TLR 7 Sub the TLR 7 wins.
Mounting Options
It’s tough to declare a clear winner in mounting options because you also have to take into account your individual firearm.
With that said, the Mini Valkyrie 2 utilizes a standard Picatinny rail mount and comes with multiple locking bars for different rails. This works well for a wide variety of firearms but doesn’t fit guns like the SIG P365 or Glock 43X without an adapter, which adds even more size.
Different mounting systems might make your decision for you.
The TLR-7 Sub comes in various configurations that include a standard 1913 short rail system. Streamlight also produces light options with adapters for things like the P365 and Glock 43X, and Glock 48 MOS series. The TLR 7 Sub offers more mounting options total, and to me, it’s a winner, but if you have a standard 1913 rail, it won’t really matter.
Raw Power
Here is where things get twisted and can be a bit of a hazard if you don’t fully understand each light. I will say outright that in this Mini Valkyrie 2 vs. Streamlight TLR 7 Sub contest, power is one of the most important considerations. Small lights are kind of weak when it comes to power, but in this section, there is a very clear winner.
Let’s start with the Mini Valkyrie 2. It boasts 600 lumens! That is 100 lumens more than the TLR 7 Sub, so it must be the winner! Well, no, for two reasons. First, Olight likes to advertise that they have so and so many lumens, but what they don’t tell you is that the max lumen count is 600 for about a minute before it steps down and eventually arrives at 60 lumens.
Streamlight blows away the Olight.
The TLR 7 Sub is 500 lumens and stays that until about the time the battery gets extremely low. The second reason the Streamlight TLR 7 Sub cleans the clock of the Mini Valkyrie 2 is in candela. Lumens are great, but candela is critical. The Mini Valkyrie 2 packs only 2,500 candela, whereas the TLR 7 Sub comes with 5,000 candela.
Candela allows all those lumens to move forward and increases the illumination range of the light. It also helps the user overcome photonic barriers. Candela is critical, and the Mini Valkyrie 2 just doesn’t have it.
Battery Options
The battery options between these two lights are another user preference, so it’s tough to declare a winner in this section of our Mini Valkyrie 2 vs. TLR 7 Sub. I personally prefer the Sub’s CR123 setup. This makes it easy to swap batteries when it gets low.
Recharging the internal battery requires a magnetic adapter.
Like most Olight’s, the Mini Valkyrie 2 uses a rechargeable magnetic port. A USB-compatible charger makes it easy to charge on the nightstand or in a vehicle should the need arise. The QD mount makes it easy to detach and charge.
When it comes to battery life, the Streamlight TLR 7 sub wins with 90 minutes of power versus the Mini’s 60 minutes of power. Also, the Mini Valkyrie 2 often has a parasitic drain issue that means the battery drains even when not in use. This means it needs to be on the charger nightly.
The Other Stuff
The TLR 7 Sub can be submerged in water, and the Mini Valkyrie cannot. Both have ambidextrous switches that are easy to engage and function well. I have no ergonomic issues with either light. I’ve done a number of drop tests with both lights, and neither failed to function after being dropped at multiple angles.
I like the switches on both lights…
Price-wise, the Mini Valkyrie 2 comes in cheaper, but that’s to be expected. In my opinion, the Mini Valkyrie 2 simply doesn’t deliver and isn’t on par with the TLR 7 Sub. The TLR 7 Sub dominates the light with multiple mounting options, superior power, a mostly smaller size, and is even more waterproof. Paying a little extra for the TLR-7 Sub is the right move.
What say you? To me, there is a clear winner, but am I missing something? Let me know below what you think.
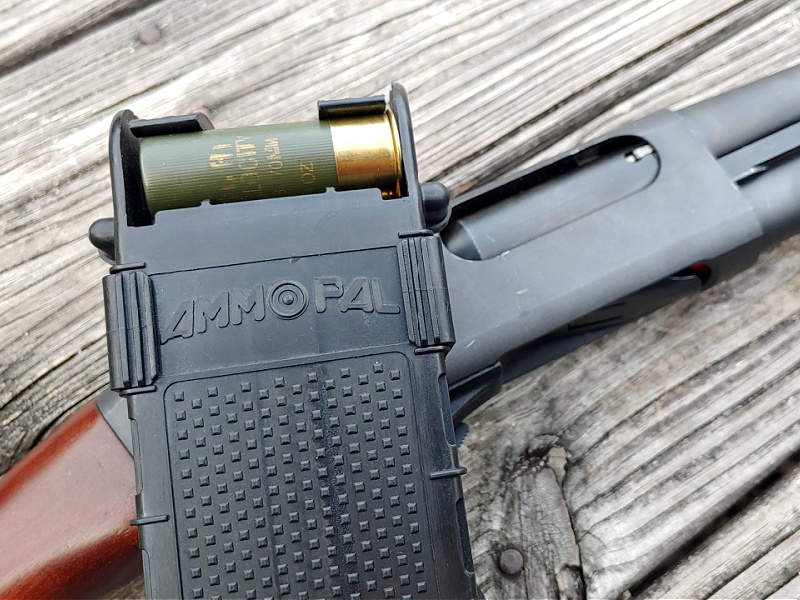
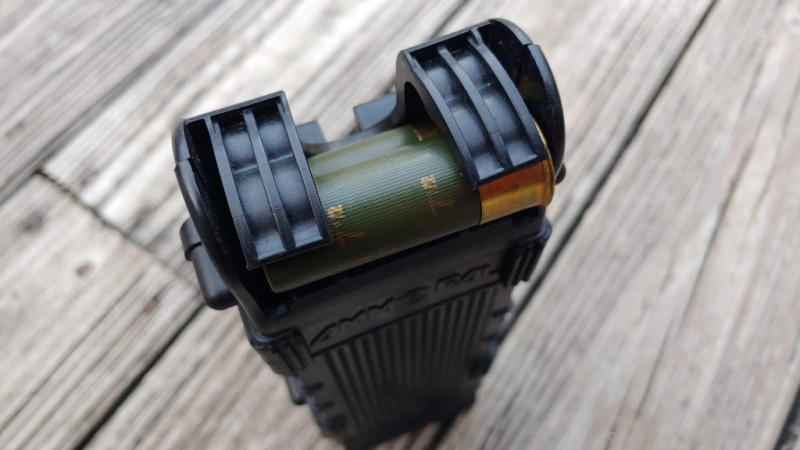
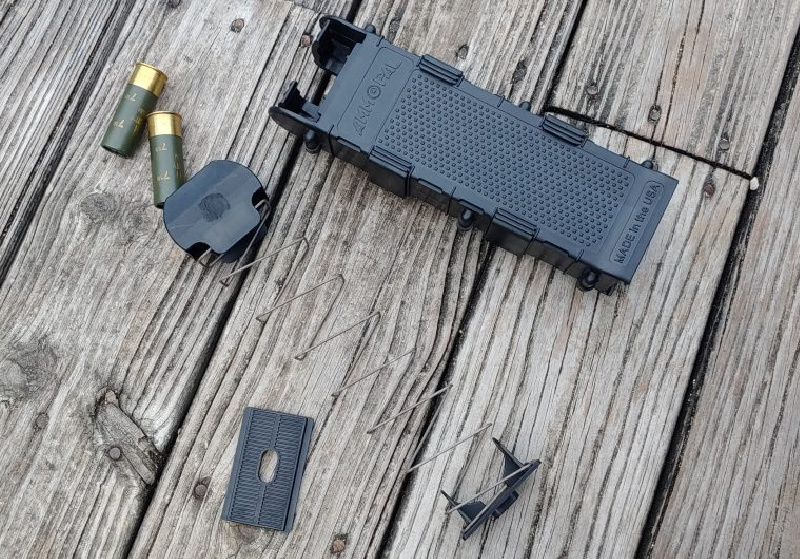
As a shotgun nerd, I pay attention when new shotgunny things hit the market. Carrying spare shotgun ammunition has always been an issue due to the bulk of the 12 gauge round and the fact that most shotguns are loaded a single round at a time. We’ve seen belts and bandoliers that hold a dozen rounds, five-round MOLLE mounted bandoliers, pouches, and more. But the AmmoPal is the first time someone made a Pez dispenser for shotgun rounds.
The AmmoPal dispenses one shell at a time.
I’ve had an AmmoPal since 2017, and it’s been used on various pieces of kit and reloaded a dozen different shotguns with it. When they popped up on GunMagWarehouse, I jumped at the opportunity to review one of these bad boys. Shooting Made Easy Created the AmmoPal to simplify carrying shotgun ammunition. It’s not a bandolier, and not a single elastic loop is used.
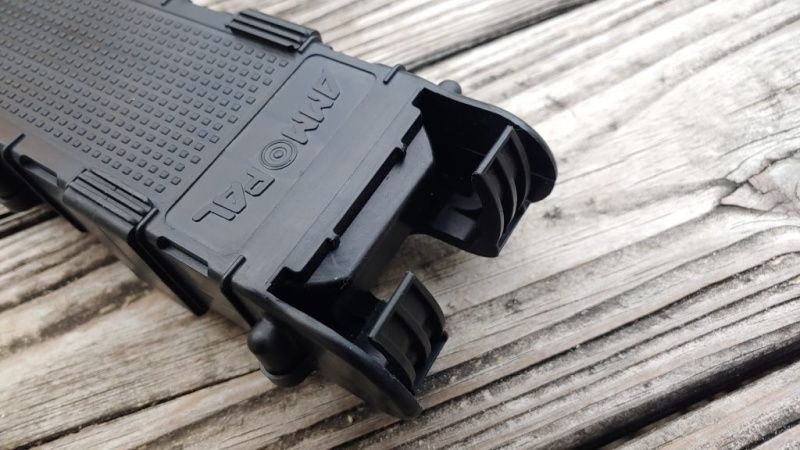
Instead, the AmmoPal acts like an independent magazine for your tube-fed shotgun. It’s a polymer constructed rectangle, complete with a spring and follower to push rounds to the top. Although, the AmmoPal doesn’t get inserted into any firearm. It simply feeds you one round at a time to keep your shotgun topped off and well-fed.
The AmmoPal Inside and Out
The AmmoPal gives shooters the capability to carry ten 2.75-inch shells in that big polymer rectangle. That polymer is built to last and made from a UV, oil, and flame resistant polymer. It feels thin and light, but it’s pretty tough. I’ve dropped it numerous times in sand and dirt, on concrete floors, and more. Over the last five years, it has yet to crack, break, or bend in any way.
The feed lips hold the rounds on the left and right. Getting the rounds in and out is easy.
Shotgun ammunition is fed through the top of the magazine, and instead of feed lips, we have two retaining fingers on each side of the shell. The fingers sit on the right and left of the shell and allow you to use your thumb to get behind the center of the shell and pop it out with ease. Unlike a standard magazine, you can load the shells facing right or left, alternating or whatever.
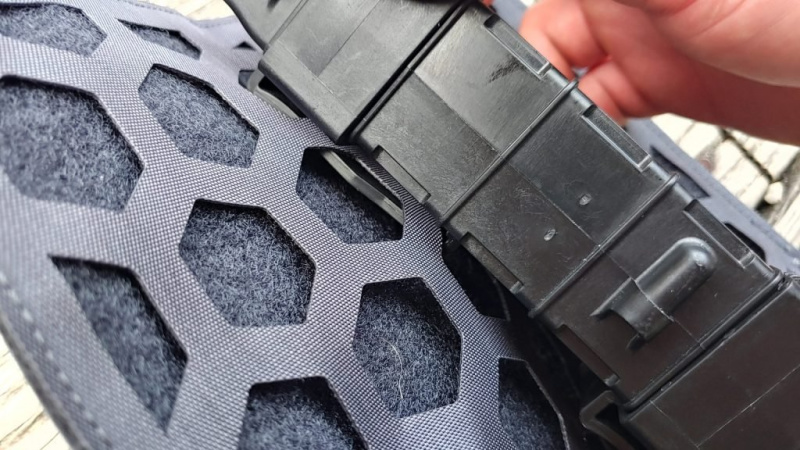
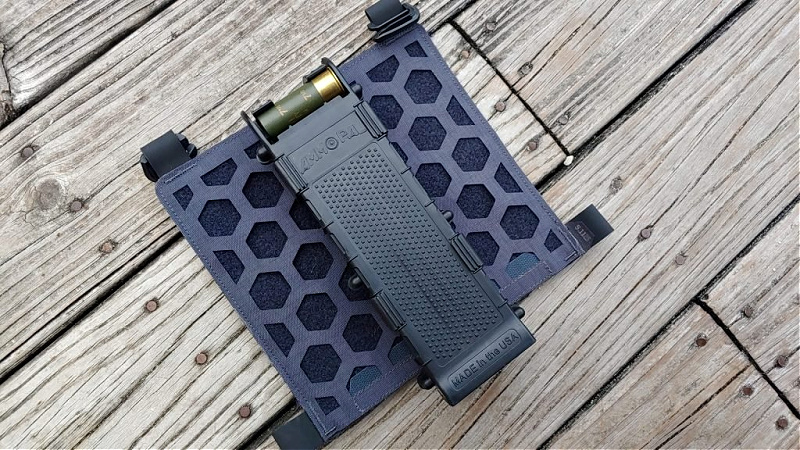
You can mount your AmmoPal to a belt, to a plate carrier, battle belt, etc. Two sets of clips allow it to be mounted to MOLLE or a standard belt, and you can use a single clip or both, depending on what level of security you want.
Up, Down, All-Around With the AmmoPal
The AmmoPal can only run vertically unless you have side-mounted MOLLE on your gear. I do wish they’d release clips to allow it to run horizontally on all equipment. You can reverse the clips and run them upside down, but it is tough to use upside down.
The AmmoPal connecta to MOLLE without issue. I do wish we had a set of clips to make it run horizontally than vertically.
The AmmoPal is ambidextrous and the clips can be detached with a snap. Without the clips, the AmmoPal will fit into a double 5.56 magazine pouch if you want to roll that way. You’ll have to squeeze the AMmoPal in most of them, but they fit and won’t pop out.
The Shells
You are stuck with using 2.75-inch shells with the AmmoPal. Not shorty shells, not 3-inch magnums. Those 2.5 shells fit but bounce around, and I can see them being a reliability issue. Stick with 2.75-inch rounds. I’ve never had it fail. As shotgunners know, 2.75-inch shells vary in actual length depending mostly on how they are crimped.
The AmmoPal works like a magazine, except it doesn’t insert into a gun.
For example, I have Rio 00 buckshot that is supposedly only 2.75 inches long. I’ve found that I can only fit four of them in a five-round tube, with the fifth round just barely not fitting. The AmmoPal provides a little slack to accommodate these different lengths.
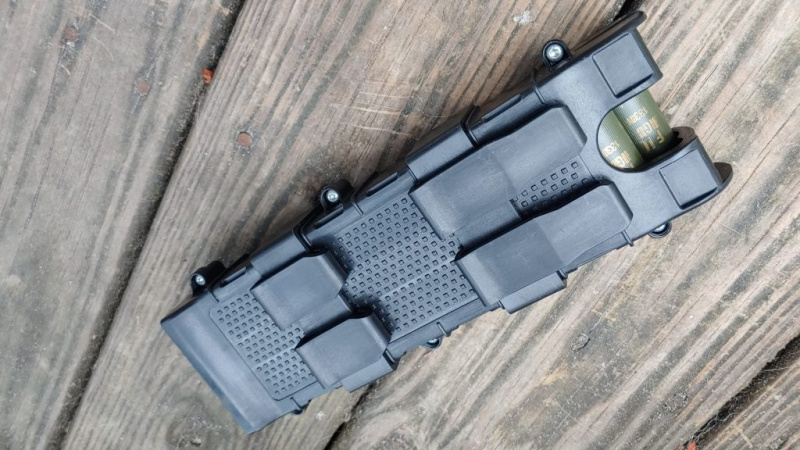
Like any magazine, you can break it down by removing the floor plate. Inside you’ll find a nice spring made with the same material as your standard AR 15 magazine and a very robust follower. Cleaning it takes no time at all, and the big size makes it easy to get sand, dirt, and the like out.
Like a magazine, it pops apart and you can clean the inside.
Loading the AmmoPal isn’t difficult either. The spring and follower move with ease. Since it’s not feeding a gun the AmmoPal, the spring doesn’t have to be super tight. It will get the shells to the top and won’t pin them against the retaining fingers in such a way as to make them difficult to remove.
Feeding Your Shotgun
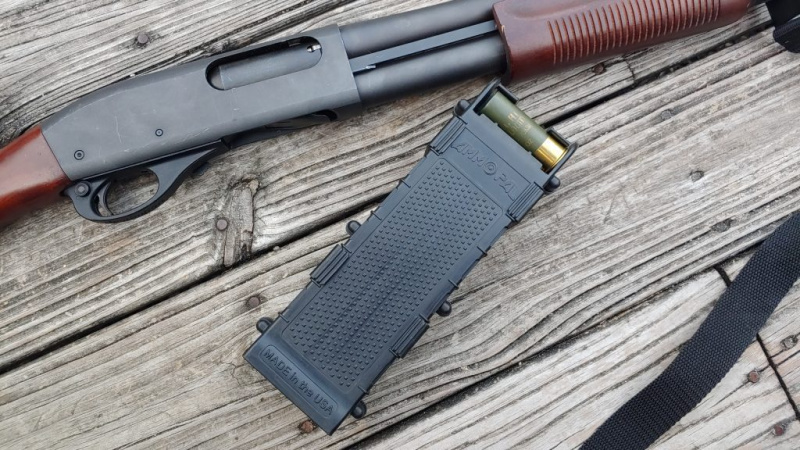
Most plate carriers allow you to fit three AmmoPals to the front of the carrier. This gives you thirty rounds on tap in an easier-to-reach and less obtrusive way than bandoliers, pouches, and similar shotgun feeding options. If you run multiple AmmoPals, you can run one full of slugs and two full of buckshot, and as Pastor Troy says, vice versa. Outside of the top round, the majority of your ammunition is protected from the elements inside the AmmoPal.
That’s the tactical way to carry ammo, but heck, I don’t see why you couldn’t strap one of these to a belt when you go bird hunting. It’ll provide ten rounds in a convenient, belt carried manner.
You can attach three AmmoPals to a small MOLLE panel.
Regardless of how you choose to use the AmmoPal, you can feel confident that using it is pretty dang easy to get rounds into your gun. Push the round with your thumb into your fingers and shove it in the gun. It’s not hard, and if you are left-handed, you might do it a little differently than a righty, but not by much.
You can very easily remove the rounds from the AmmoPal and shove them in your gun. To me, it’s easier to use than a bandolier or a five-round MOLLE attachment. I don’t have to transition from left to right for more rounds. I have one constant index point to reload from, and that’s quite nice when you need ammo in a pinch.
The downside is that it takes more time to remove more shells. It’s easy to pull two shells from a bandolier at the same time but tougher to do so with the AmmoPal.
Can I Leave It Loaded?
Leaving shotgun magazine loaded can be problematic. The pressure from strong springs will make the plastic hull deform over time, and this will cause feeding issues. However, the AmmoPal uses a rather tight spring, and I’ve left my loaded for lord knows how long, and the shells were not deformed in any way.
It won’t break from being left loaded, and the shells look perfectly fine after sitting for what’s easily been nine months to a year. I feel confident you can leave your AmmoPal fully loaded and not face issues.
Like a magazine, the follower presses the rounds upwards.
Overall, the AmmoPal provides a very well-made option for stashing shotgun shells. Carrying spare ammunition for the shotgun is always tricky. The AmmoPal offers a simplistic option that works with modern tactical gear. I’ve always thought that consistency was the key to speed, and the AmmoPal does provide consistency when it comes to where your ammunition sits for retrieval.
That alone can be invaluable. If you’ve used one, let us know what you think in the comments below.
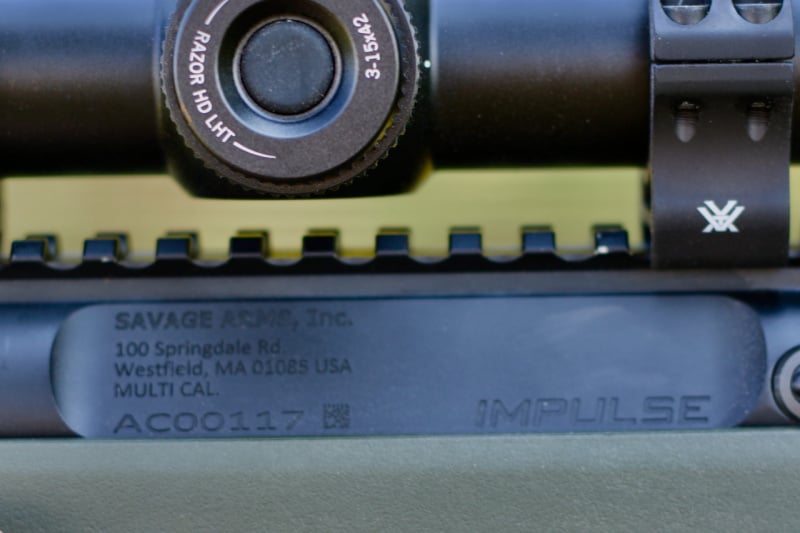
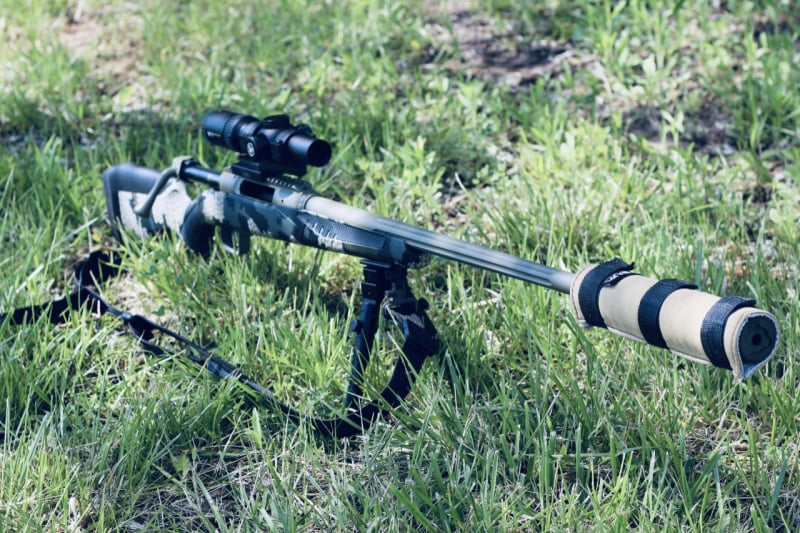
Savage Arms makes solid guns. Their reputation for innovation is well deserved, especially when it comes to bolt actions. If there had been a SHOT Show in 2021, one of the big stories would have been the Savage Impulse — an American-made straight-pull that stands as a classic example of how Savage keeps shaking things up…and makes us wonder what, if anything, they’ll have to display at SHOT Show 2022.
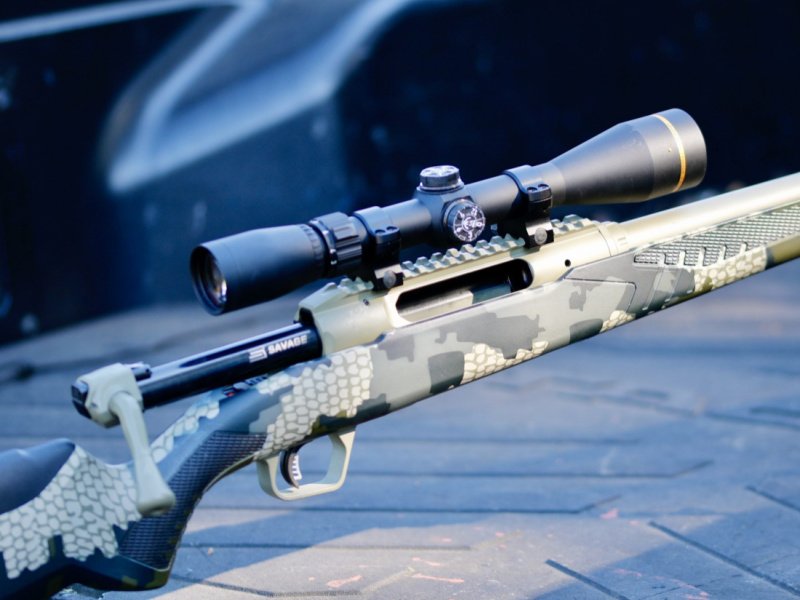
The Savage Impulse Big Game in 6.5 CR. For long-range accuracy, Impulse delivers.
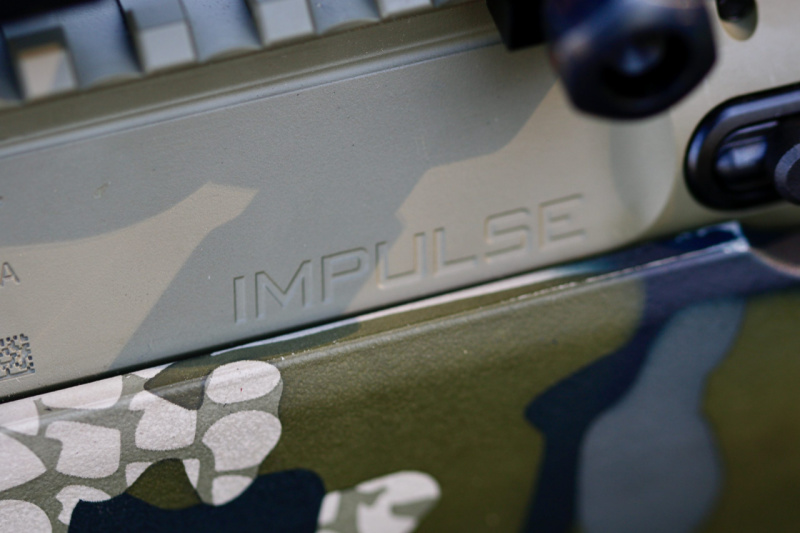
What is Impulse?
There are a couple of elements that set this gun apart from the rest of Savage’s bolt-action rifles. The most noticeable is the straight-pull action. The bolt throw on Impulse moves straight back to eject a round and straight forward to return to battery.
This stands in direct contrast to a typical bolt action that has four distinct motions: up, back, forward, and down to lock. Two motions are faster than four motions.
The bolt slides straight back. The bolt handle can be positioned at different angles or on either side.
Inside the action, the bolt locks into place with Hexlock, a system of ball bearings that expand out from the bolt head when the bolt is seated in battery. There’s a plunger inside the bolt body that forces each of these bearings out, locking them in a channel that is milled inside the action. This is harder to explain in words than it is to see on an example.
When the plunger is disengaged, the bearings are free to move, as they are here.
A pull of the trigger releases the plunger, allowing the bolt to travel backward. There’s also a button on the back end of the bolt that, when pushed, allows for the bolt to be extracted without pulling the trigger. This is how live rounds can be pulled safely.
The bolt doesn’t rotate. It slides straight back.
These six ball bearings keep the pressure from blowing the bolt rearward during live fire. As the pressure increases in the chamber, the bearings are forced into the grooves. As that pressure subsides (when the bullet leaves the barrel), the bearings are free to move again, and the bolt can be yanked to the rear with no difficulty.
To disengage Hexlock without pulling the trigger, simply press the Savage logo on the back of the bolt. This releases the plunger that is forcing the bearings into the milled slot in the chamber.
The important thing to know is that when the Hexlock is locked, it isn’t going to move. When it is unlocked, the gun won’t fire. This creates an inherently safe design that differentiates Impulse from other straight-pull designs.
To pull the bolt out of battery, simply yank it to the rear. It will rotate a few degrees as it unlocks, then the whole bolt shifts back.
What else?
Inside the action is a barrel sleeve that is similar to that on an AR. The barrel connects to the extension with four bolts. While Savage isn’t selling the barrels independently, it could be an option and would open up options for barrel swaps or caliber swaps. All that would be needed would be the new barrel and a new bolt-face (assuming you were staying in either the short or long-action lengths).
Impulse barrels are marked with the caliber. The 110s are offered in 27 calibers, and the Impulse line is catching up.
What is familiar already?
If you know the Savage technologies, many of which have the prefix “Accu” affixed, Impulse will feel familiar. This is a bolt-action rifle, and Savage does this very well.
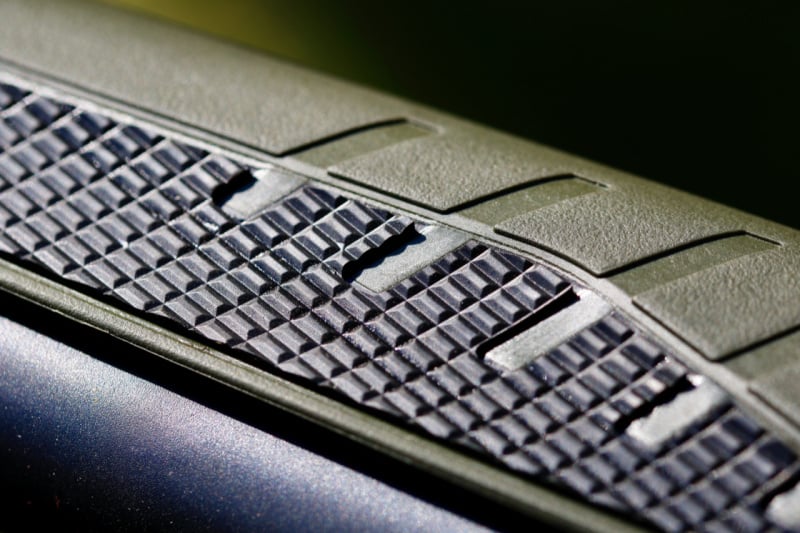
The polymer stock of the Hog Hunter has an over-molded texture.
The AccuStock is an aluminum bedding that secures the action in the stock. The milled block provides a solid platform for the action, which is partly responsible for the repeat accuracy of these guns.
The AccuFit system is equally important. AccuFit allows for extensions to length-of-pull and comb height. This allows for the stock modifications needed to fit almost all shooters.
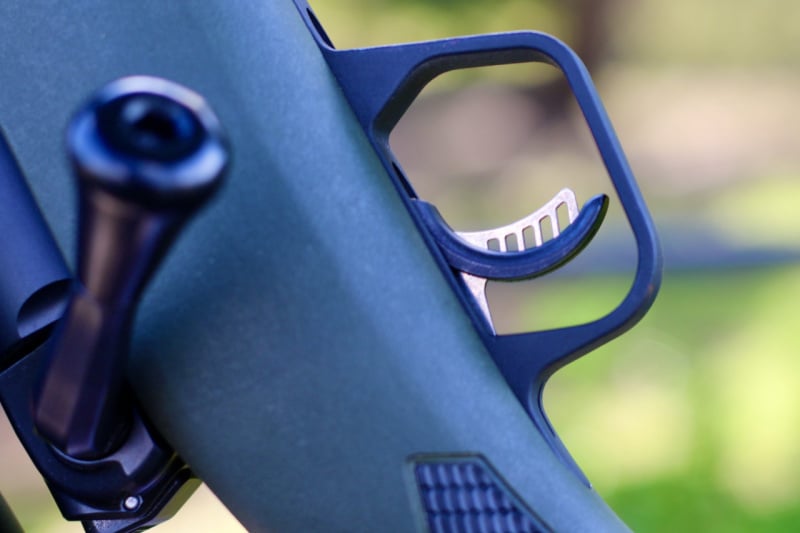
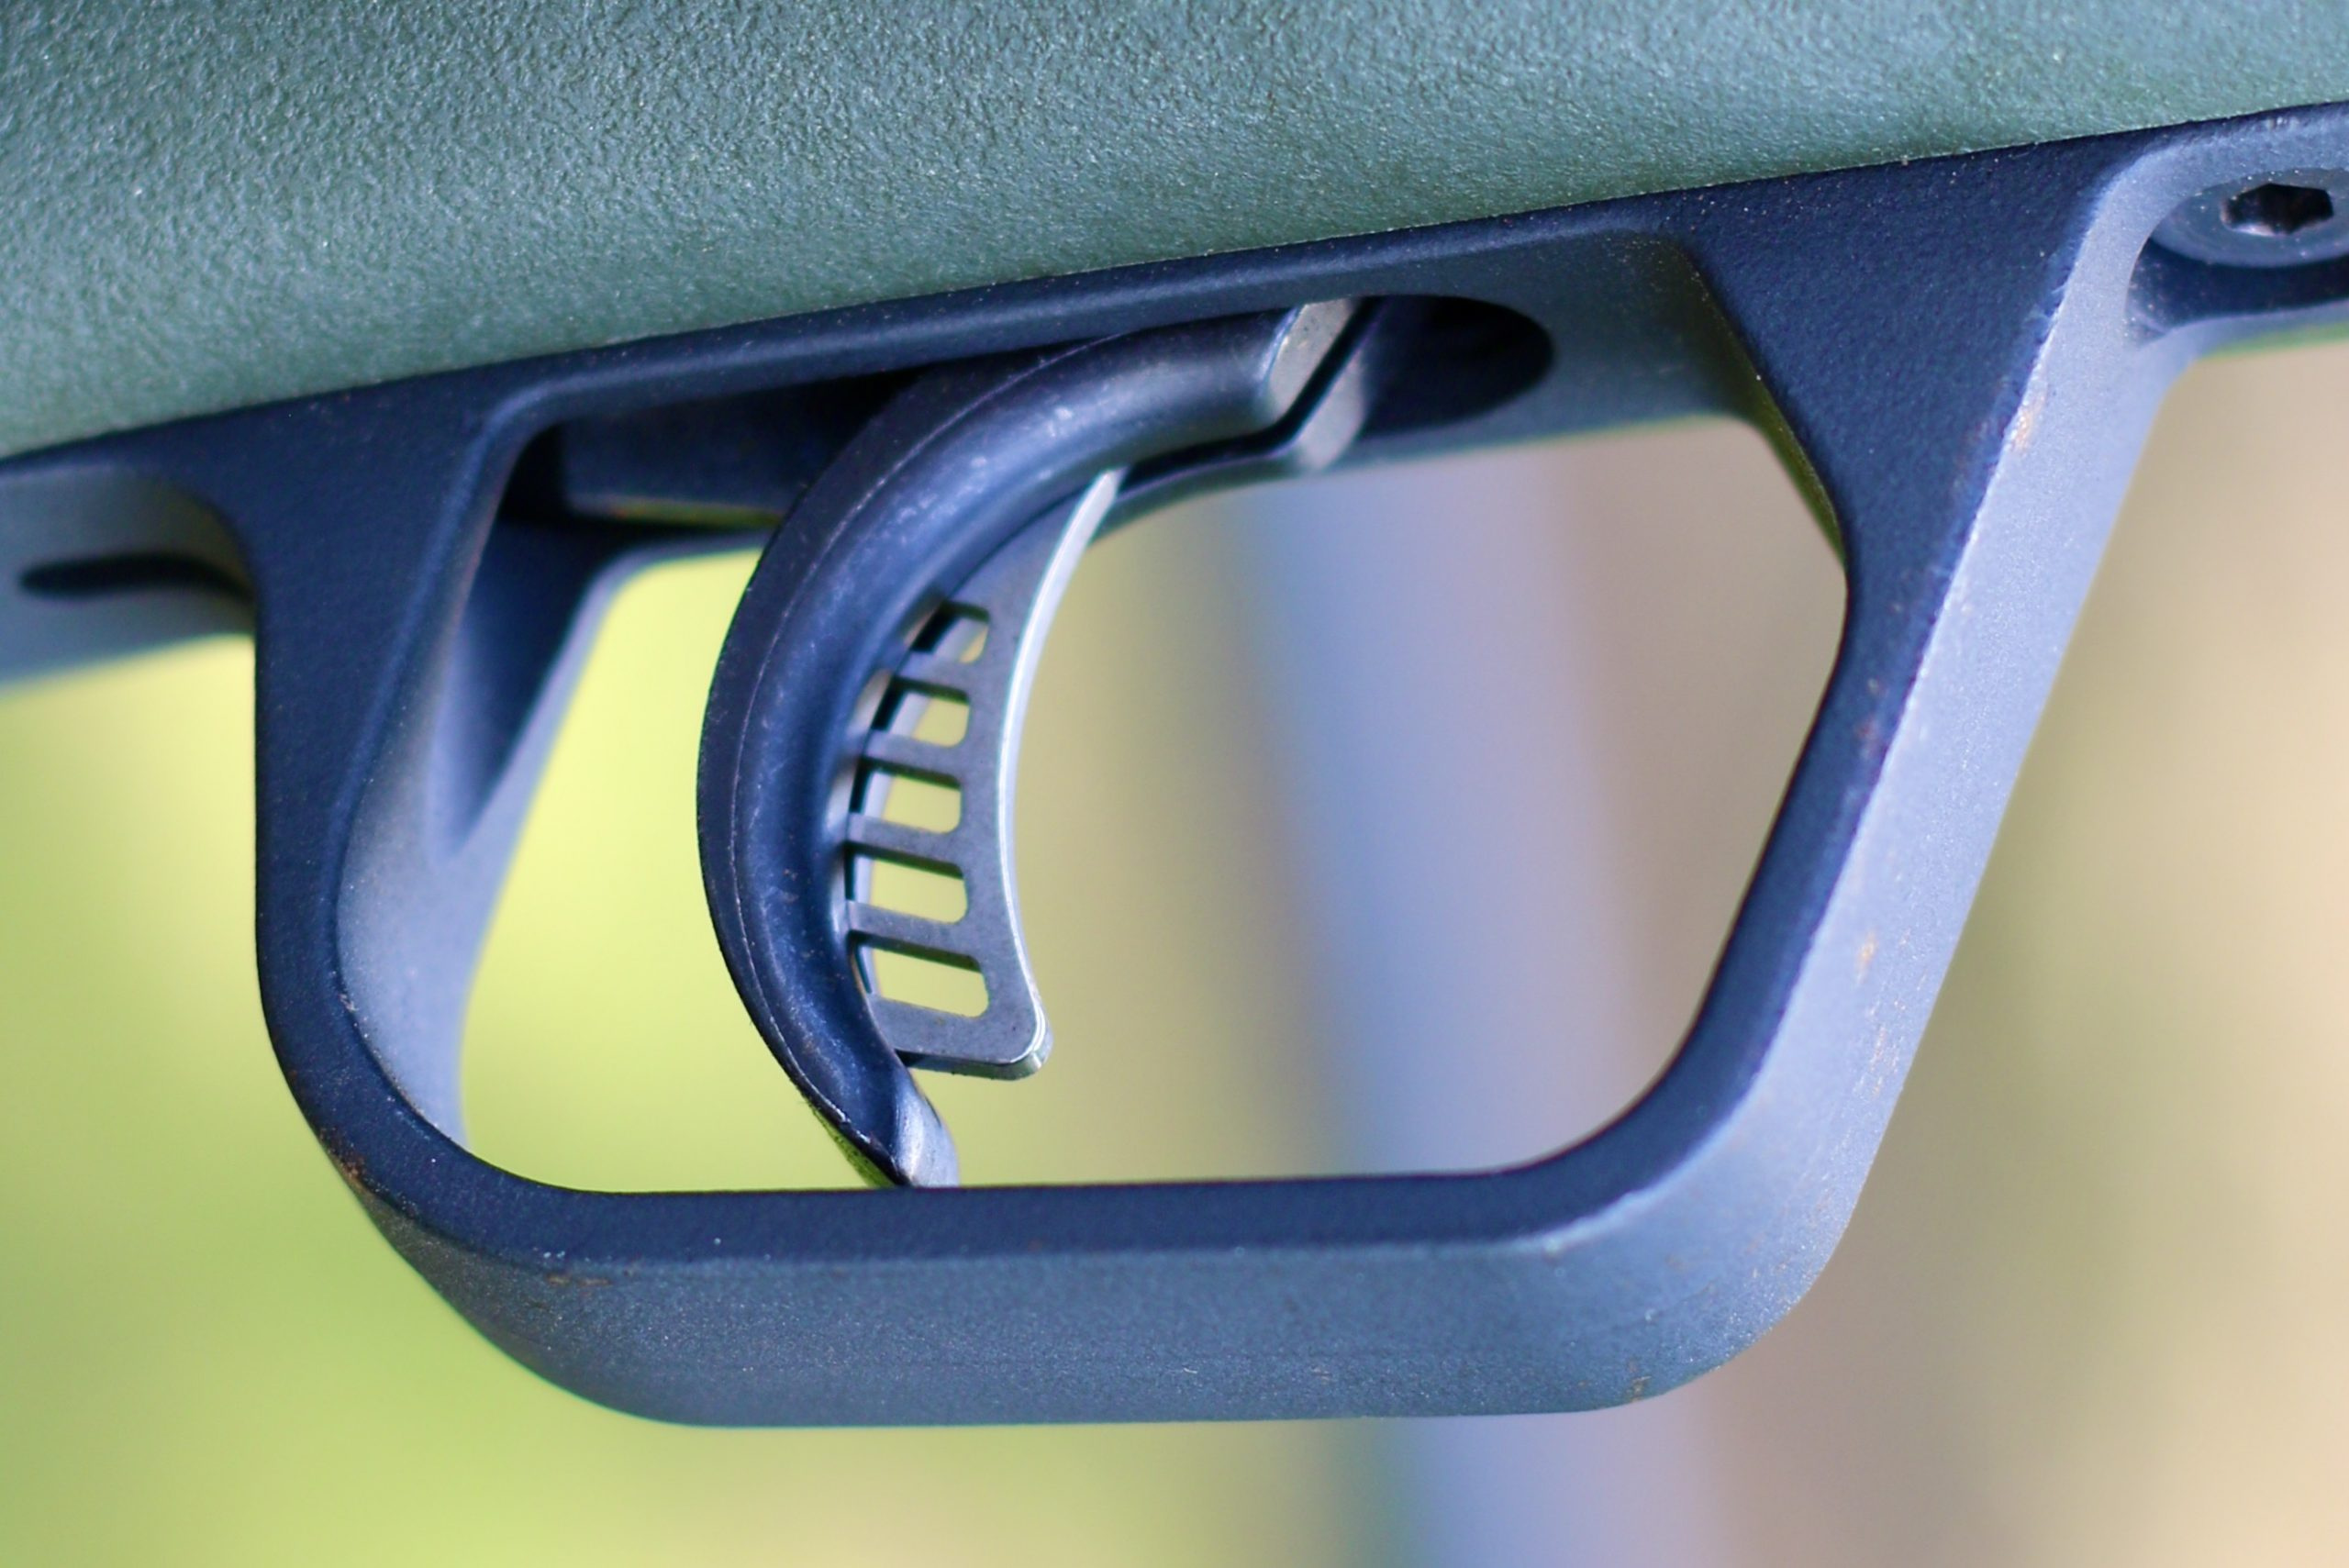
The AccuTrigger provides user-adjustability for pull weight.
AccuTrigger, likewise, allows users to make adjustments. Dial it down to 1.5 pounds for reliable bench shooting, or dial it up if you are going to be walking through dense woods.
The trigger on the Hog Hunter and Big Game rifles are on par with the triggers I’ve run on Savage 110s. The AccuTrigger is excellent and something Savage has obviously mastered.
The bonus?
For me, I’m thrilled to have the milled rail integral to the design. These are 20 MOA rails for those who want to take Impulse out to extreme distances.
The 20 MOA rail is milled in.
And barrels on these guns come threaded from the factory: 5/8-24”. This is a great option for those of us who prefer to hunt with cans.
The Impulse rifles (in this case, the Hog Hunter) come threaded.
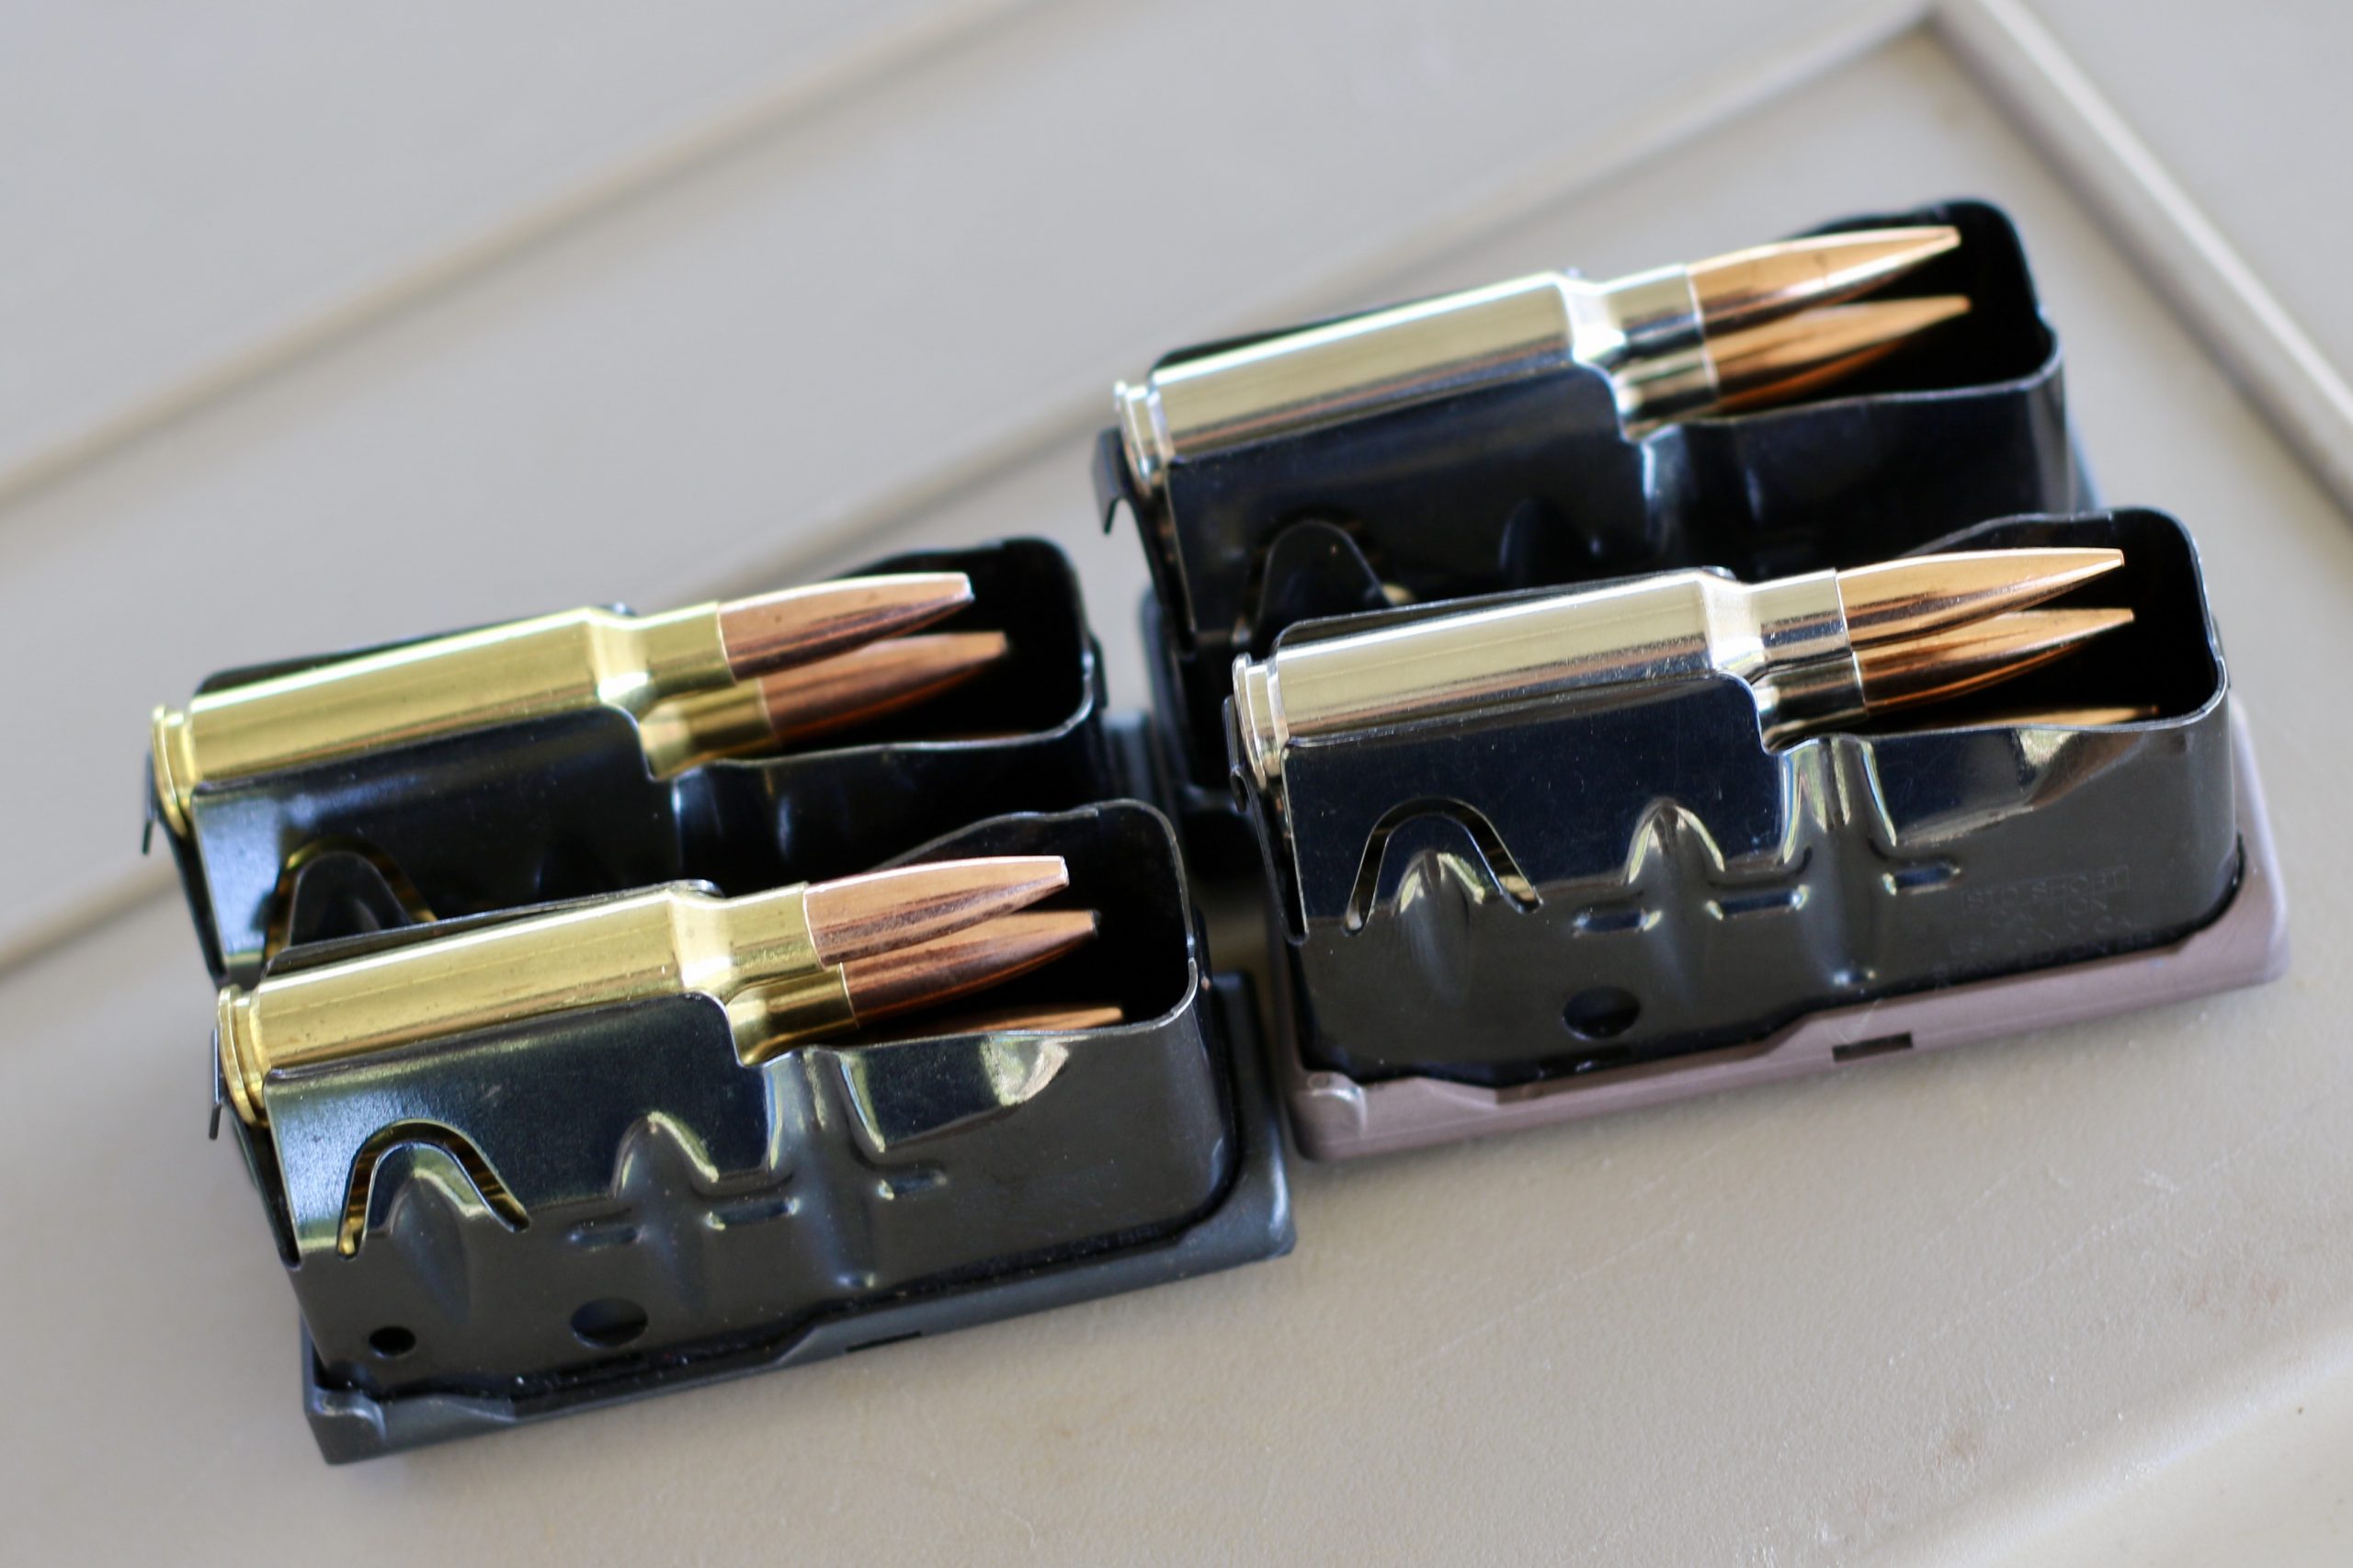
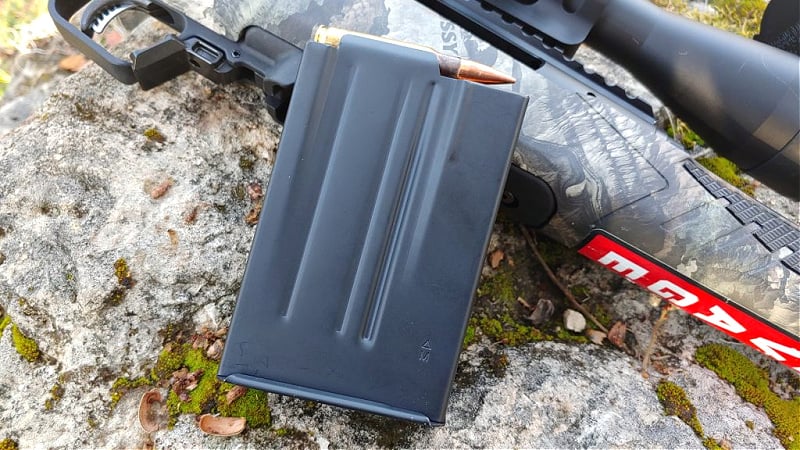
The magazines
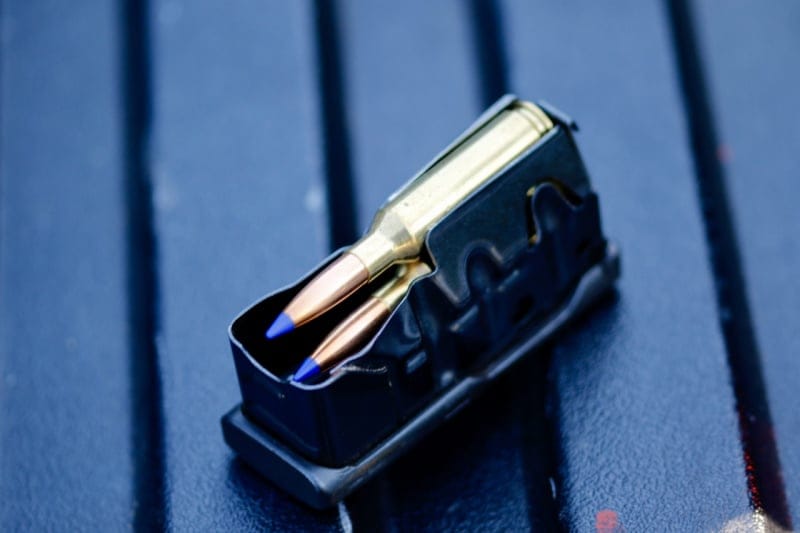
Savage’s flush-fit mags are steel and reliably solid. There’s some flexibility to the feed lips that allows rounds to snap through (as in you put the round on top and pop it in, rather than using the case to force down the follower before sliding the round under).
The mag for the Savage Impulse. The steel mag rocks into place and locks securely.
Depending on the caliber, you can get 4 rounds in a mag for most of the .30 calibers.
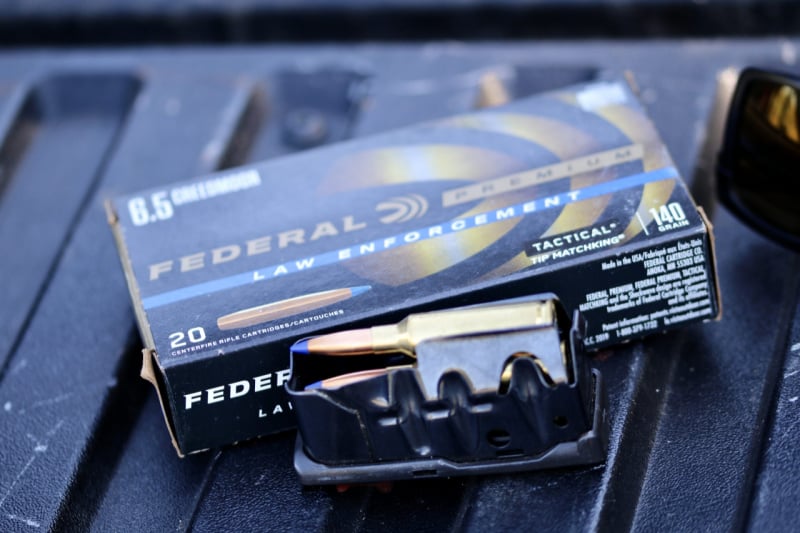
The 6.5 Creedmoor is a steady round. I’ve not had the opportunity to find the best fit (bullet design/weight). When ammo supplies are low, you shoot what you have, and I have this 140 grain LE round from Federal, which is performing exceptionally well out to 1,000 yards.
Shooting Impulse
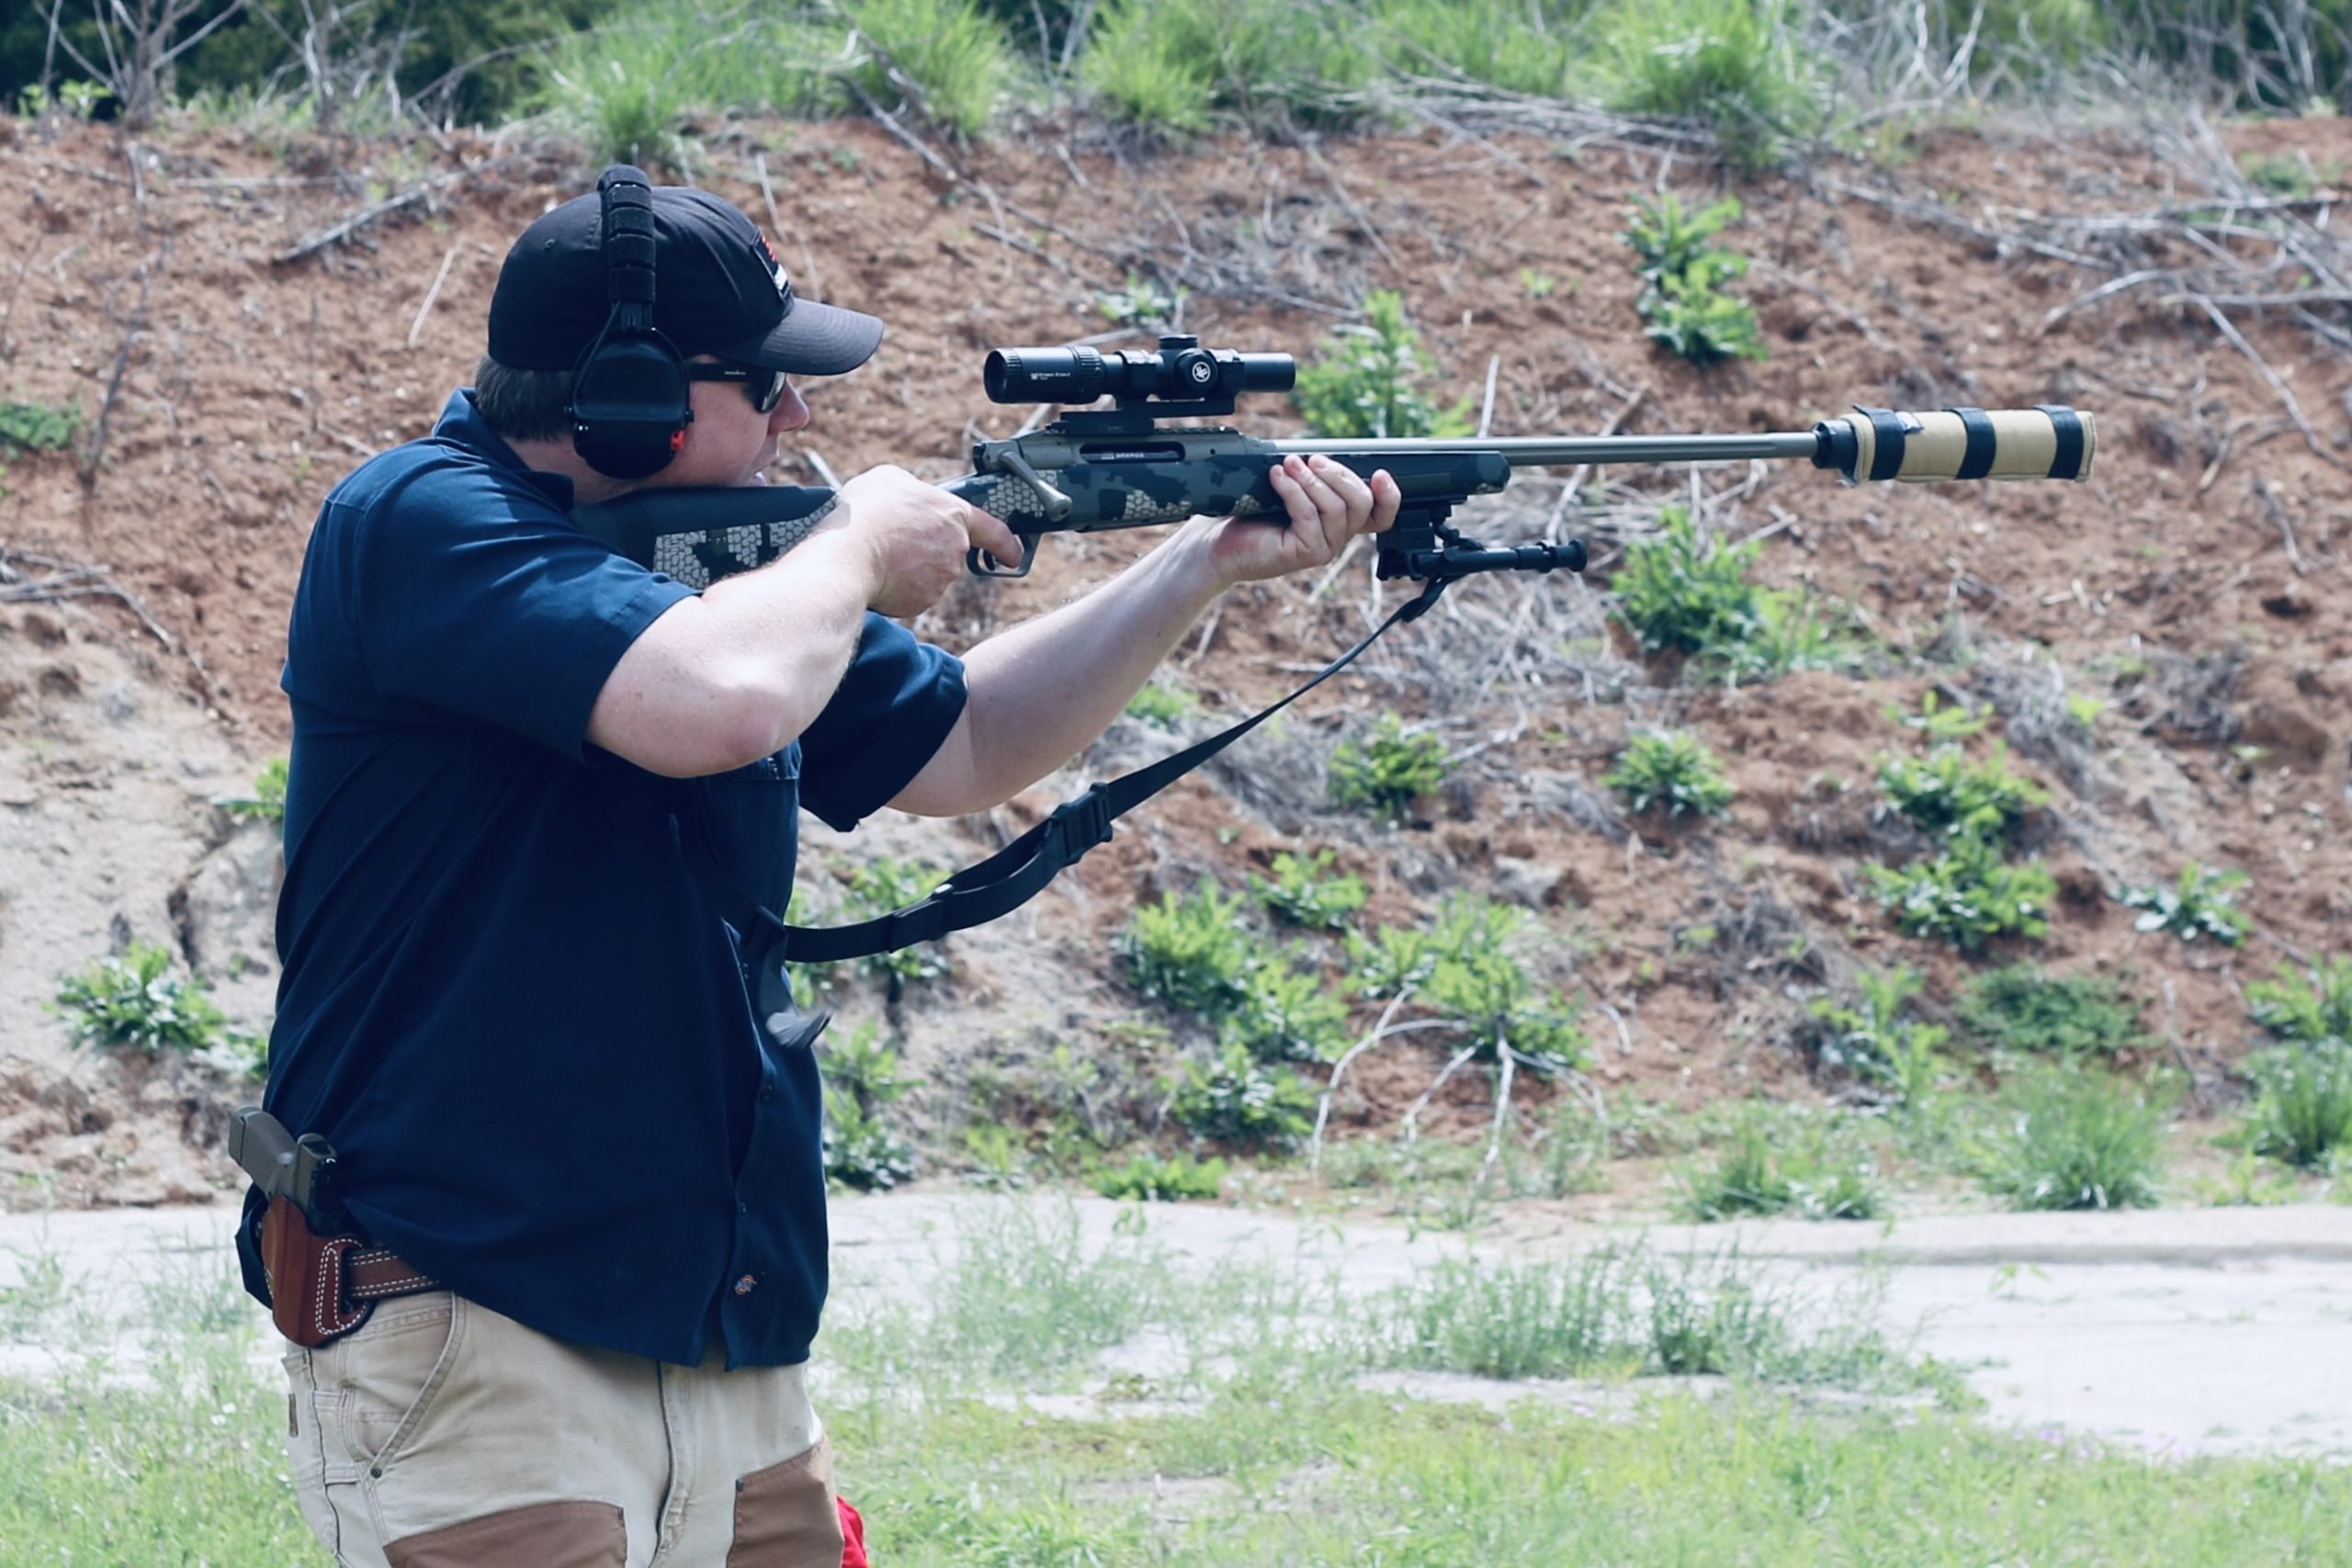
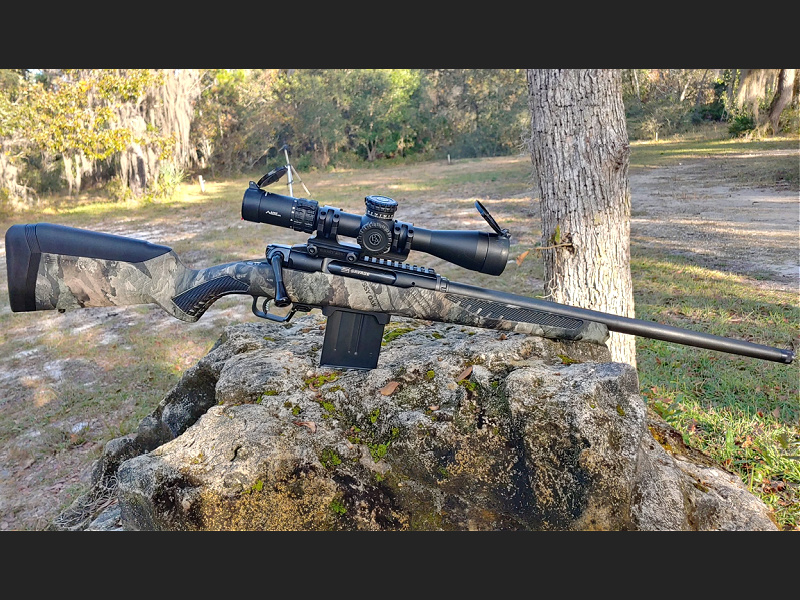
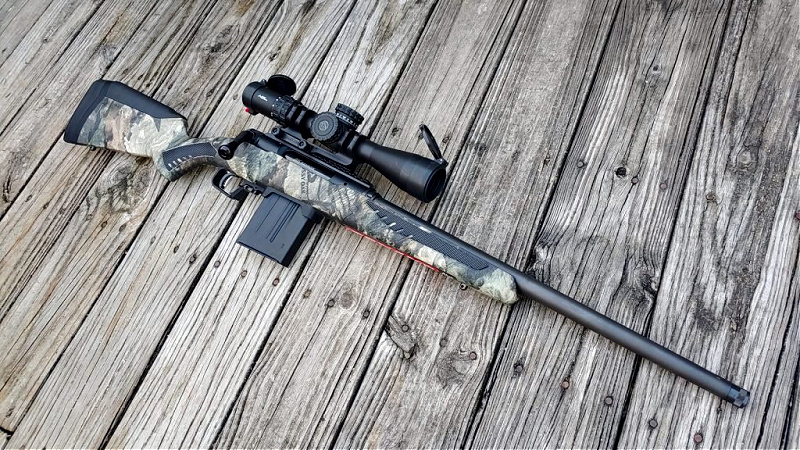
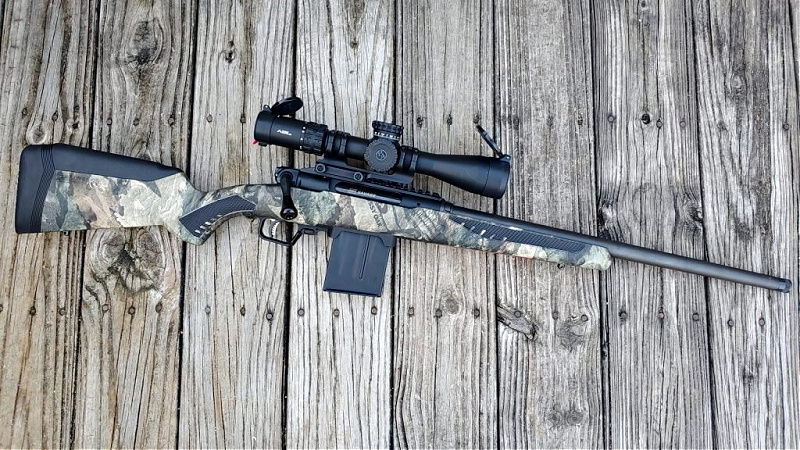
I’ve been working out two Savage Impulse rifles—one a .308 Hog Hunter that I took hog hunting last spring, and a 6.5 Creedmoor Big Game (which is the one in Kuiu Verde camo). I’ve shot it on several ranges, and at a Practical Rifle course that was run by Rainier Arms.
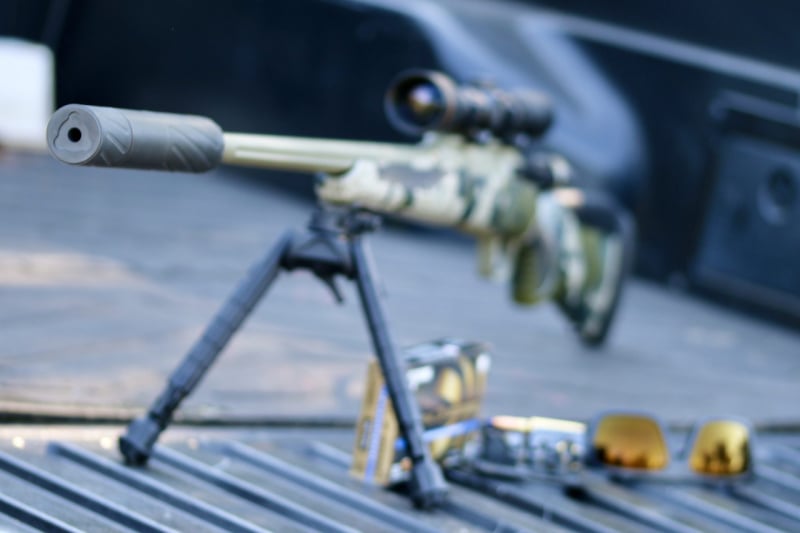
With a bipod, silencer (a Banish 30), and a scope, Impulse is ready for just about anything. Just know that this Impulse, naked, weighs 8.8 pounds.
Both guns have performed as advertised. The Hog Hunter was the first of the guns that I’d had the chance to shoot and it is shorter, but on par—size wise—with other bolt-action .308s.
I was able to shoot a hog with the Hog Hunter. You won’t see the gratuitous dead pig picture here, though. Long story.
It was early afternoon, in the Everglades, and hotter than hell. The top of the elevated stand was in direct sunlight, so I climbed to the top, positioned the rifle and my gear, and then climbed about halfway down the ladder (to where the shade started). I had a while, I thought, before I would see a pig, so I was dinking around with a camera.
This is where I’d staged my rifle when the big hog moved out under my elevated stand—more than 20 feet off the deck. With multiple hunters on the same stretch of land, it is best to shoot down, and not out.
I was there, leaning on the lower rungs, when a tiny hog—barely big enough to make a football—went screaming under the oaks ahead of me.
This side of the Florida woods looks well kept when compared with the wild Everglades swamp that it straddles. I was screwing around with camera settings, sitting in on the lower rungs of the ladder when I snapped this pic—moments before the little hog bolted through.
I was watching that frenetic little pig when I picked up the sound of something under me through my hearing protection. There, coming up behind the stand was a fat hog. I’ve been known to exaggerate, but not this time. This was a really big pig—I’d estimate it weighed in excess of 600 pounds—I’ve killed several over the 300-pound mark, and this one was easily twice the size of any of those, maybe more.
I could have easily jumped from my ladder and landed on its back—something I’ve foolishly done with insane Florida hog hunting guides once before, back when I didn’t value my life so highly. But sane people rarely leg big hogs twice.
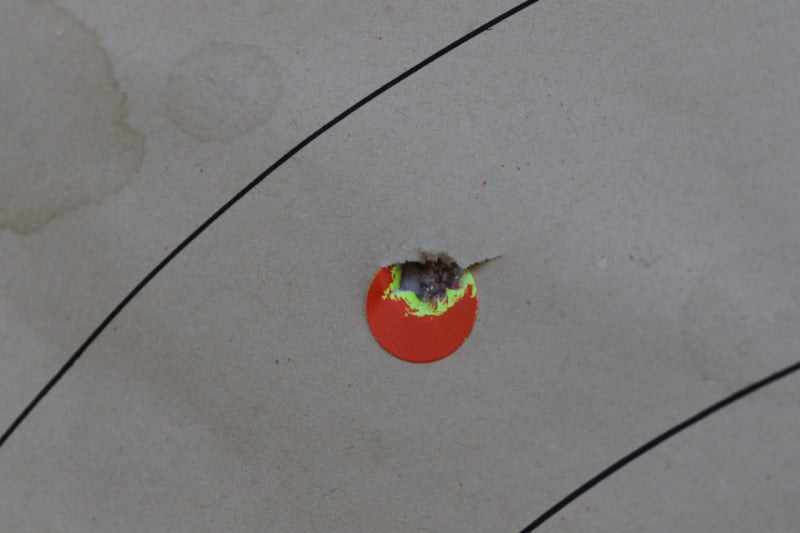
Instead, I ran up the ladder, got behind the gun, threw a cartridge in the chamber, and put a round directly down between the hog’s shoulders. By this point, it was running full-tilt. I ripped back the action, slammed it home again, but lost the pig beneath the outstretched arms of the oaks that cut off the path the pig took to get away.
The Vortex Razor reticle. It lights up, which is helpful when lining up on a black hog.
There was a minuscule blood trail—only really at the point of impact—and the pig shat itself, but that was all of the sign I could find. the pig had bolted and vanished. After all of the hunters had come in that evening, I went back out with lights but couldn’t find any more signs. We watched the skies for buzzards over the next two days but saw none.
The Vortex Razor was full of hog when I pulled the trigger.
The .308 Hog Hunter had done its part. This hog hunter, though—me—I could have taken a better shot. This was not one I’d ever prepared for—shooting down onto a hog from above. I was confident when I pulled the trigger, but that damn thing was huge and my one chance wasn’t enough to drop it immediately.
On the range with Impulse
Sighting in the Savage Impulse Big Game on paper at 100.
I’ve had far better luck on steel targets. I’ve had a couple of opportunities to take the 6.5 Creedmoor out to 1000 yards, and the rifle has performed well. Shooting from a bipod from the bench is easy and I can put rounds on a 12-inch plate at 1000 once I walk it in (I’m not a gifted mathematician, but I can work with a spotter).
Three shots in (almost) one hole.
At closer ranges, Impulse is shooting lights out.
At 300 yards, my groups spread out as you’d expect. There’s still less than 3 inches of spread.
And it may seem strange for me to talk about taking ethical shots at 300 yards after admitting that I failed to pull off a kill shot at what couldn’t have been more than 100 feet, but here it is. Impulse is far more capable than I am, obviously.
Better to be lucky than good? Spot on shot from 300.
Practical Rifle?
The Savage Impulse is designed to be fast. As hard as my adrenaline was pumping with the hog, I should have been able to get a second shot off. The action is fast enough. But I didn’t.
Silencer Central’s Banish 30 takes the sting off the 6.5 CR.
After my hunting debacle, I took an Impulse to a Practical Rifle class taught by Rainier Arms. This was an all-day class that pushed bolt-actions and lever-actions through a course of fire that ranged from close-range targets to much longer ranges.
The Big Game runs well at speed. I fired from the shoulder (with and without sling bracing), from prone, close, at mid ranges, and at 200-300. In each case, Impulse did what I needed it to do.
My set-up for the Rainier Arms Practical Rifle Class.
In one high-round-count day, I had no malfunctions. The only issue I had was an occasional live cartridge that would hang up in the chamber if I tried to extract it without firing it. In each case of this, though, I could run the bolt back into battery and pull it again, with more gusto, and strip the cartridge free.
An all-day run-and-gun course with a big rifle isn’t easy.
This isn’t a light gun, though: 8.8 pounds. I added to the weight, of course, with an optic, a sling, and a bipod. And then, for good measure, I added a Banish 30. With the suppressor and everything else, the Big Game had some mass.
The weight helps stabilize offhand shots. But by the end of the day, I was having trouble getting the muzzle end up. I’m not exaggerating. Holding it steady after running and gunning for more than 8 hours was taxing.
Stacking up the mags for quick changes.
But the Savage Impulse is fast. In this class, there were some lever-actions that were faster. That said, there were numerous bolt-actions, including a couple of Savage 110s, that couldn’t hold a candle to the speed of Impulse.
Getting your mind around Impulse
This is the section where I’m supposed to tell you just what Impulse is good for. That, from my perspective, is easy enough. Most American hunters, with the way we hunt, only take one shot. And Impulse, like a Savage 110 or AXIS II, delivers.
But what if you need or want a second shot? Hog hunters, coyote hunters, varminters of all sorts — the Impulse is much faster than a traditional bolt-action.
The Big Game has a healthy coating of Cerakote to protect the receiver and barrel.
At close range, you may still benefit from the additional speed of a lever-action. While it is conjecture, I think I may have had a better chance on my hog if I’d been running any gun without an optic (as I had a hard time getting back on the pig before he was under cover with a scope).
The safety selector is tang mounted and is easy to actuate with your thumb, without having to look at it.
But know this, too. There’s not a lever-action made that will compete with Impulse for long-range accuracy. While many of my classmates were beating me to the punch at distances of 50 yards or so with their lever-guns, those of us running bolt-actions were smoking them at distance.
To pull the bolt from the gun, press this lever in.
Impulse works. The action’s lock-up provides the confidence needed to get down on the stock behind a straight-pull action, and Savage’s integrated technologies set up the platform to provide reliable, repeat accuracy.
And the price-tag on an Impulse? Good luck finding one. Stock is beginning to pick up. MSRP on the Hog Hunter is $1,379.00. With the Big Game, it increases to $1,449.00.
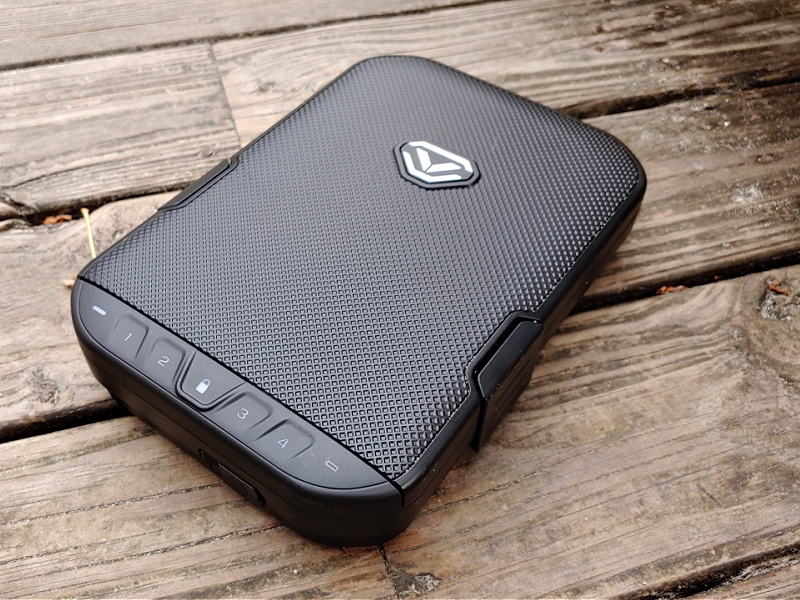
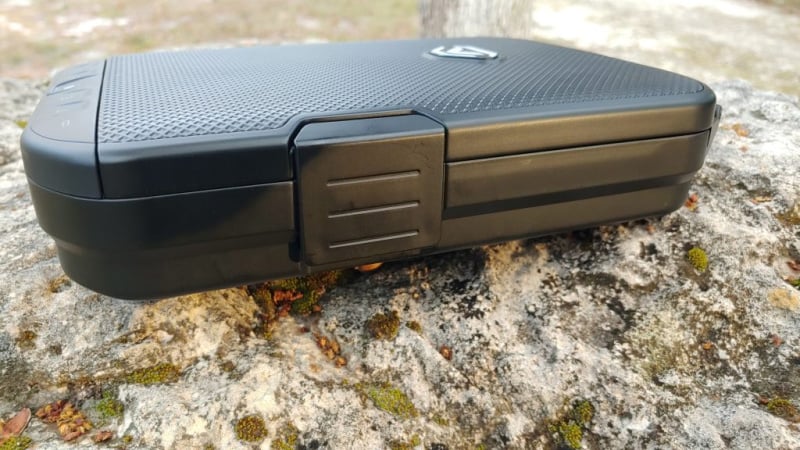
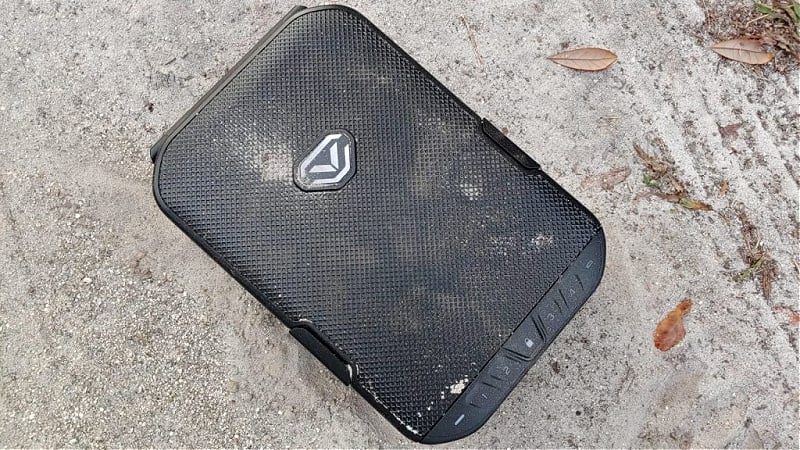
VaulTek? Isn’t the company from Fallout? A google search reveals that the Fallout company is Vault-Tec, and VaulTek is an American safe company that designs and produces technology advanced safes. They make a variety of small to moderate-sized safes. Today we are looking at the very cool and compact LifePod. Specifically, the Lifepod 1.0, which is the smaller variant of the LifePod. Also, just because I have to mention, they make a humidor LifePod, and that’s just all kinds of cool too.
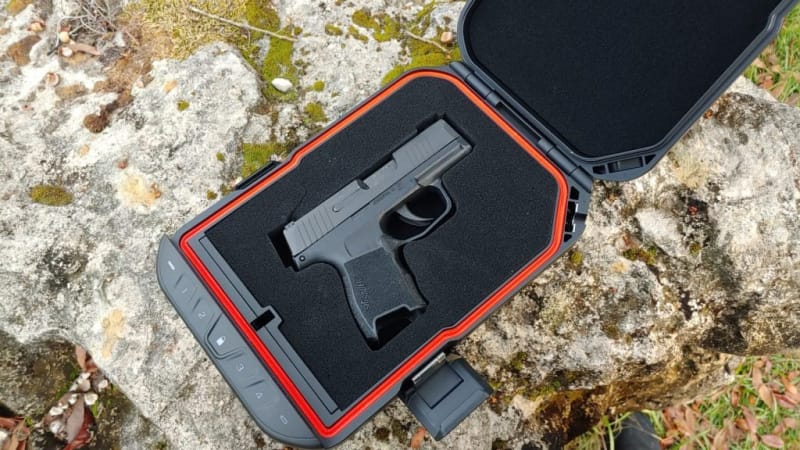
The LifePod 1.0, henceforth referred to as the LifePod, is a 10.25″ L x 7″ W x 2.25″ H mini safe that weighs two pounds and three ounces. The inside of the safe gives you 7.75″ L x 6″ W x 1.75″ H of internal storage. As you can tell, this is on the small side of safes. It’s roughly the right size to fit a duty-sized handgun or smaller. A competitive-sized firearm with optic and light wouldn’t be the best option for this small safe. It fits a firearm that’s 7.75 inches or shorter.
Breaking Down the LifePod
This small safe is more than your average lockbox. It’s made from a mix of metal and some form of polymer. VaulTek calls it an impact-resistant proprietary material blend. Is polymer weaker than metal? Sure, but this isn’t intended to be a long-term firearm storage option. Hell, boxes this small don’t need to be cracked open when they can just be swiped and stolen.
The LifePod is a handy, high-tech safe that is brilliant and easy to use.
Also, unlike your average lockbox, the LifePod comes with a digital locking system that uses a 4 to 8 digit combination. The digits are 1 through 4, and then the Lock button fires the thing up for you to key your code in. When you press the lock button, the keys light up a dim red for easy visibility.
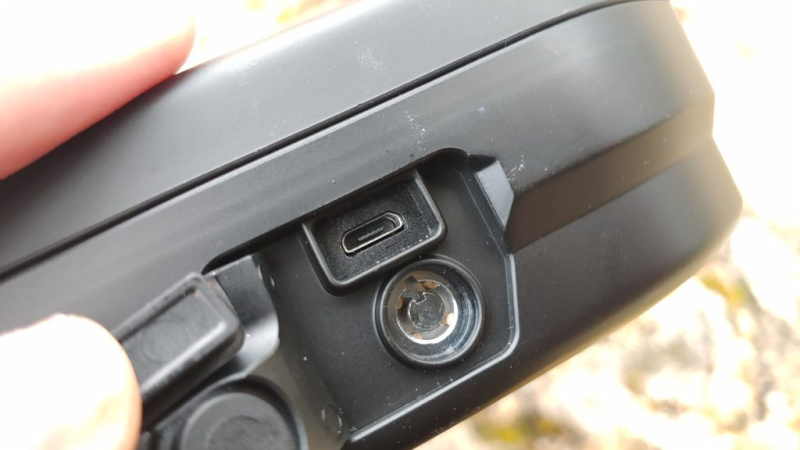
This is your main lock when securing the firearm. Powering the lock and keypad is done via a micro USB cord or a 9-volt battery. This setup allows it to be a cord-free journey safe or to act as a backup if the power goes out. Additionally, should the power go out or the battery dies, you have a manual key as a tertiary means to open the safe.
A backup key and USB port is concealed behind a rubber cover.
Everything Proof!
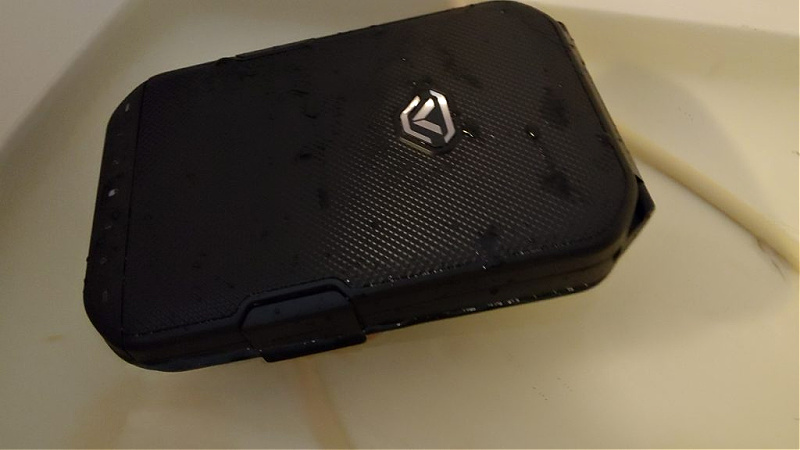
On the sides sit two dual compression latches. These don’t lock but, compress the door down and ensure it’s also a waterproof design! Yep, it’s adventure approved. Oh, besides being waterproof, it can also float, so if it falls overboard, you can easily retrieve it without worrying about losing it. As a kayaker, this is something I seriously appreciate.
These side latches make the safe air, dust, and waterproof.
Along with being waterproof, it’s dustproof and airtight too. Dustproof is a must-have for me. I live on a dirt road and sandhill so the moon dust here gives Iraqi moon dust a run for its money. I’ve never found dust in the safe, and that’s after years of life in a dust bowl.
Dust won’t get in this bad boy and neither with water or air.
The LifePod can be dropped at any angle, including its corners, without popping open. Drop it, kick it, toss it, and it will take the beating without issue. The LifePod takes lots of abuse and protects the treasures you store inside from everything.
Set Up For Success
Sure the LifePod can act as a gun safe, and hell, that’s what I use mine for. However, the LifePod can be used to secure damn near anything for a wide variety of reasons. It’s perfect for securing cash, electronics, jewelry, and more while traveling. Expensive goodies like camera equipment or sensitive items like hard drives and SD cards can be stashed and secured while remaining protected.
My LifePod is used to store a handgun so I got some custom cut foam for it.
Most of us use these kinds of things to limit access to something, be it a firearm, a Rolex, or a hard drive full of rare Hentai. The LifePod can do that, but more than just secure the goods, it can protect them. The LifePod’s foam-lined interior adds a good degree of protection, and the factthat it is air, water, and dustproof adds an entirely new level of protection to your goods.
When I go fishing or kayaking, I can stash my wallet, cell phone, and car keys in the LifePod. I’m not securing from theft but protecting them from life. If they fall overboard, I know they’ll float and remain protected until I retrieve them. The same goes for backpacking and hiking.
Yep, it floats. This is my deep sink since the wife prohibited guns in the tub.
The sleek and slim design of the LifePod paired with its lightweight nature makes it perfect for hiking and camping. Again I’m securing goods but also protecting them from that cruel bitch we call nature.
How I Use the LifePod
As mentioned, I use the LifePod for a variety of tasks, but the main use is as a gun safe. Specifically, it acts as a car safe. When I know I’m going somewhere I can’t legally carry a gun, I want a safe to lock it up. I’m not dropping it in my glove box like an idiot and hoping no one breaks the window.
Instead, I drop my CCW in the safe and then use the included metal tether to secure the safe to my vehicle. Specifically, secured under and to my driver’s seat. This way, if someone tries to snatch it, they really have to work for it. It’s been sitting under my car seat for two years now, and that speaks to its durability.
Hit the lock button and the keys come to life.
This poor LifePod has been locked in the dark with barely any break for two years. Here it’s been exposed to kicks from kids, dirt, dust, and the bounces and bumps that accommodate rural living. Beyond that, it gets dropped into my kayak, or my boat, or my rucksack to get even more abuse thrown at it. Oh, and the inside is immaculate because, as mentioned before, it is dust, air, and waterproof.
Yet every time I type in my combo, the safe beeps, boops, and opens right up. The keypad isn’t tactile but is instantly reactive to my finger typing in the code. They advertise the battery will last a year, and I can say that’s more than accurate. I change the battery yearly, but it has never actually died on me. I just swap batteries for safety and convenience sake.
The LifePod is super easy to use, and quite convenient.
Staying Safe
The LifePod is one of those products that’s ultra-handy to have. It’s far from expensive, and when you factor in the quality, the electronics, and security, it’s damn near a bargain. The LifePod makes securing a firearm or protecting your goodies easy, and not just from thieves. Your stuff will be protected from the environment, from spills, tumbles, and more. If you need a bigger LifePod check out the 2.0.
I’m not much of a bolt action kind of guy. I lack the range to put a long-range weapon through its paces, and I was born into a shotgun family. Don’t get me wrong. I can still appreciate a good bolt gun. They just rarely get my motor running. One that finally did was the Savage Impulse. How did the Impulse metaphorically flirt with me?
Well, Savage promised a straight-pull bolt gun, something many of us are unlikely to be familiar with. As a milsurp fan, I do appreciate the K-31 and the M1895 Lee-Navy, but I had never seen a modern hunting rifle with a straight-pull bolt.
What’s The Big Deal With A Straight-pull Bolt?
Most bolt action rifles utilize a rotating bolt design. For the shooter to reload the weapon, they have to grip the bolt, rotate it upwards, and then pull the bolt rearward to eject a casing. Then they have to shove the bolt forward and rotate downwards to fire once more. A straight-pull bolt only has two motions, pull the bolt rearward, push the bolt forward.
A straight-pull bolt makes it easy to get fast follow-up shots on target.
As far as manual actions go, this is faster and often simpler than a rotary bolt design. Straight pull bolt guns are popular in Europe due to their rapid-fire design and the fact that semi-autos are often banned. Lots of European companies like Blaser produce straight-pull bolt guns, but it’s rare for American companies to take up the challenge.
The Impulse from Savage Arms brings the straight-pull rifle home.
The Savage Impulse — Predator
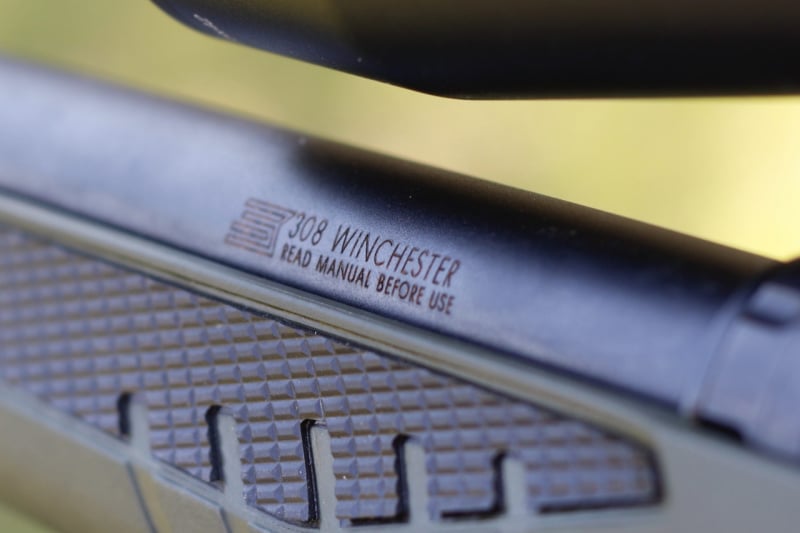
It does so with three different models. We have the Hog Hunter, the Big Game, and the Predator. I’m handling the Predator model today, in the classic .308 Winchester. Each rifle offers different barrel lengths, calibers, and stock options.
The Hog Hunter is the lightest and shortest, the Big Game offers long action cartridges like the .300 Winchester Magnum, and the Predator falls in-between. These rifles use the AICS magazines, and the Predator comes with a single ten-round magazine. We get a Mossy Oak camouflaged stock, a 20-inch threaded barrel, and it’s optics ready.
The Savage Impulse magazine platform is AICS, and is quite common.
Our stock is adjustable with a set of spacers to allow the shooter to set the length of pull. One of the first things I did was shorten it to 12.75. Even though I’m a big dude, I’m comfortable with a shorter length of pull. The comb height can also be adjusted, but it was comfortable from the factory for me.
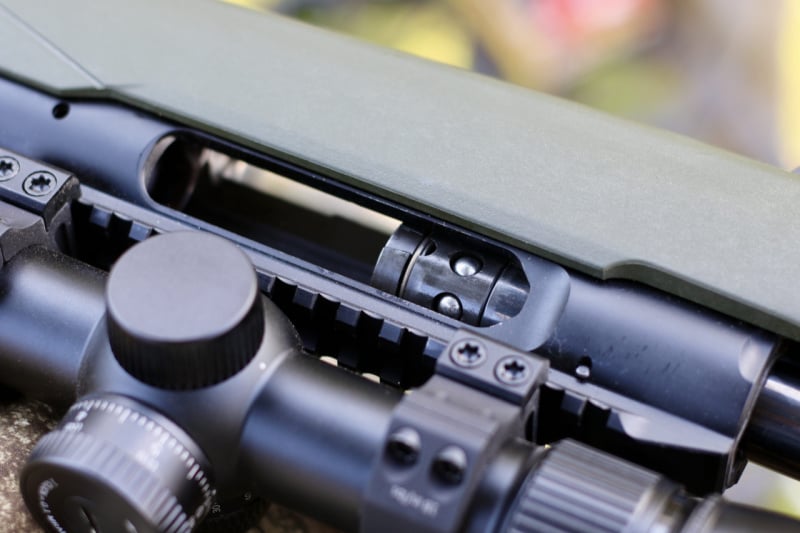
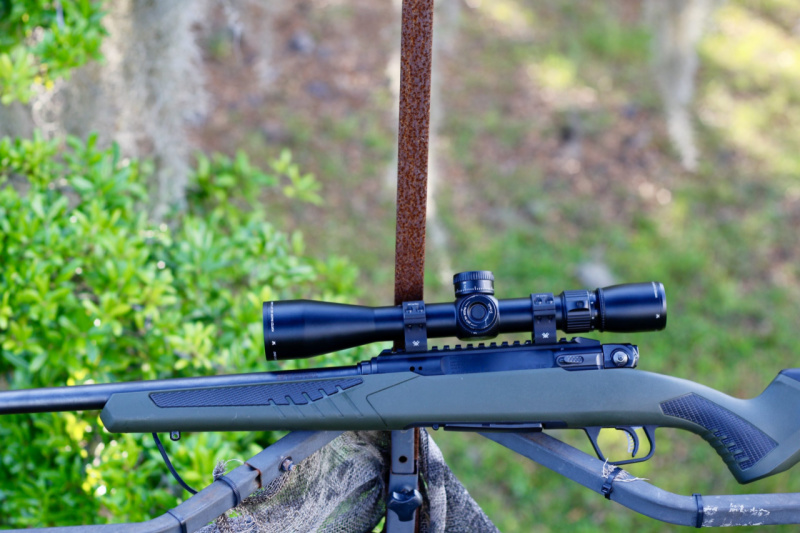
On top of the receiver sits a 20 MOA Picatinny rail that is machined as part of the receiver. This means you’ll never need to worry about loose rail syndrome. There is plenty of room for whatever optic you’ll want, and I attached a Primary Arms GLx 2.5-10X.
The Impulse is a little hefty, but easy to shoot.
My Predator comes in the good ole fashioned .308 Winchester, and with some ammunition sent from our friends at Remington, I was ready to hit the field.
Setting The Impulse Up For Success
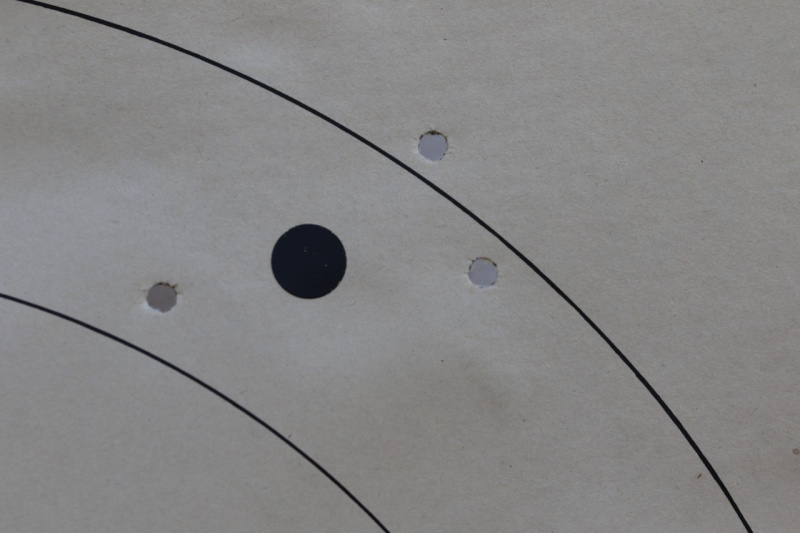
Zeroing is obviously the first thing I needed to do with the GLx and the Impulse. I started at 50 yards, made sure I was on paper, and moved back to 100 yards. I dialed in and began shooting my 100-yard groups. I’m also testing the GLx optic, so I used this opportunity to test the turret’s adjustments and slowly walked the rounds from the outer ring directly to the bull’s eye.
The bolt release and safety is easy to manipulate.
Holy crap, is the Impulse Predator an accurate gun. The rounds land next to each other consistently, and the Accu-trigger never fails to impress. It mixes a very light trigger with a Glock-style metal blade safety. This ensures you get the accuracy of a light trigger without any of the traditional risks it offers.
Once I dialed the optic in, I created a very tight group in the center. Of course, it was plagued by a flyer when I got a little overzealous. Minus my overzealous nature, and this is a sub-MOA gun at one hundred yards. With both Remington and Winchester ammunition, I scored groups in the .70 inch range at 100 yards.
At 100 yards I got a little overzealous but I felt good with my results.
I feel incredibly confident about taking this gun on my next hog hunt, or my future coyote hunt, or hell, it’s accurate enough that I feel confident taking it against prairie dogs. The Savage Accu-Bed system, the fine-tuned factory headspace, and the awesome trigger do their job.
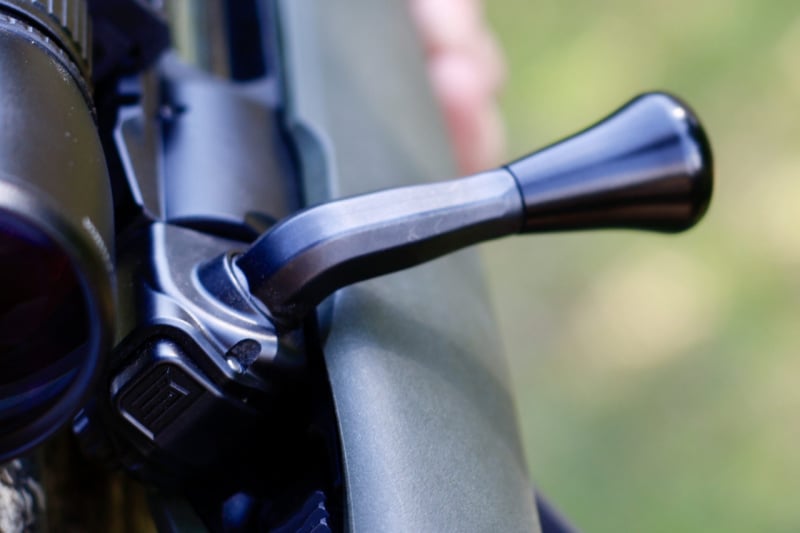
That Bolt
I haven’t mentioned the bolt yet because it really deserves an entire section. The Impulse and its straight-pull bolt are a fantastic pair. The bolt is a lot like a shotgun’s pump. Once the weapon is loaded and cocked, the bolt is locked in place. This way, nothing hits the bolt and opens up the action.
Bringing the bolt rearward doesn’t require you to break your sight picture.
A button at the rear of the bolt will allow the bolt to be manually unlocked and cycled. This way, you can easily and safely clear the weapon. After the weapon is fired (or trigger pulled), the bolt unlocks much like a shotgun pump.
Manipulating the straight-pull bolt is swift and fast. I would say it’s easily as fast as a lever gun without the downsides of a lever gun. Meaning I can work the bolt in the prone without breaking my position. Plus, I can fire spitzer bullets that maximize range and power. You can toss fast follow-up shots downrange with ease and with accuracy.
The mag release is nice, ambidextrous, and easy to use.
Killing hogs in Florida often means more than one, and being able to take an extra shot might result in an extra kill. A rapid, easy-moving bolt makes this entirely possible. The Savage Impulse combines a rapid bolt action with an accurate platform that’s perfect for scoring quick kills.
The bolt doesn’t protrude far enough rearward to pop you in the face. You can manipulate the bolt without breaking your sight picture so that follow-up shots stay quick and easy.
The Impulse of the Impulse
Another feature that makes the Impulse easy and rapid to fire is the recoil impulse. It’s fairly light — surprisingly so for a bolt gun. I honestly expected a little more jump, a little more rearward force, but I was left pleasantly surprised.
The Savage Impulse doesn’t hit with significant force. It’s downright pleasant, to be honest. Why is it so pleasant? Well, it’s because the rifle is hefty. The Impulse Predator weighs 8.7 pounds unloaded and without an optic. With the optic, we’ve hit the ten-pound point. All that weight makes it a bit hefty for carrying through the woods but makes it easy to stabilize and reduces recoil.
With hunting season in full swing, the Impulse is one helluva awesome option for the deer blind.
The weight is the only real downside of the Impulse, but even then, it comes in handy for making that fast follow-up shots. Savage put together a fantastic rifle and offers a bolt configuration, unlike most sporting rifles on the market.
The Savage Impulse does pack a heftier price than most. The MSRP is $1,379.00 dollars, with the street price being fairly lower. To be fair, that price point put lower than all the European straight-pull bolts on the market. In fact, it’s downright humble compared to a Blaser or a Browning Maral.
What do you think about straight-pull guns? Do they have a place in your tree stand? Let us know below.
Outside of sharks with frickin laser beams attached to their heads, firearms that fire laser beams out of the barrels come in as a close second as my favorite laser-type things. It’s even better if it’s a 40-Watt Phased Plasma Rifle. However, the Mantis Laser Academy Training Kit gets me part of the way there. And it actually exists! You can get fairly decent feedback with dryfiring alone, but with the addition of a laser and the 1’s and 0’s in the Laser Academy App (for both iOS and Android), you get even more data on how you suck.
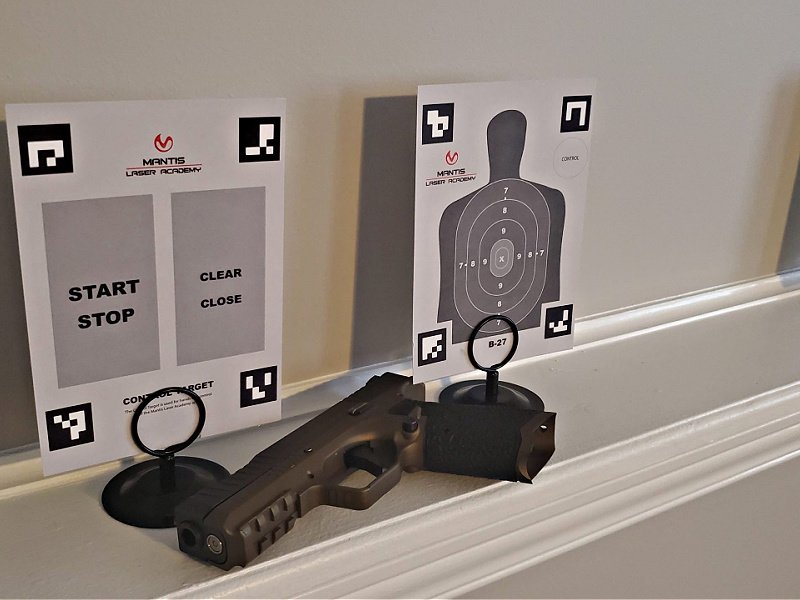
The Mantis Laser Academy kit is compact and easily packed into a bag so you can dryfire anywhere.
What Is It?
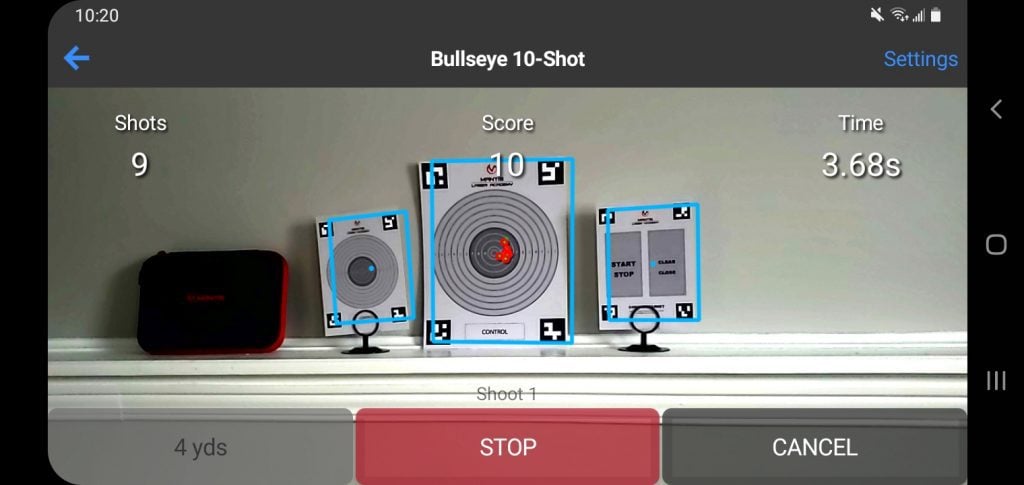
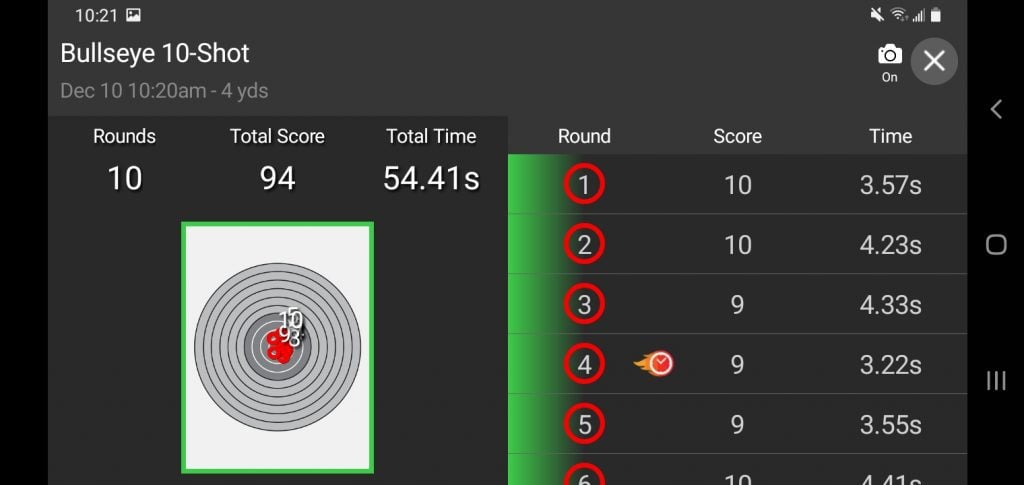
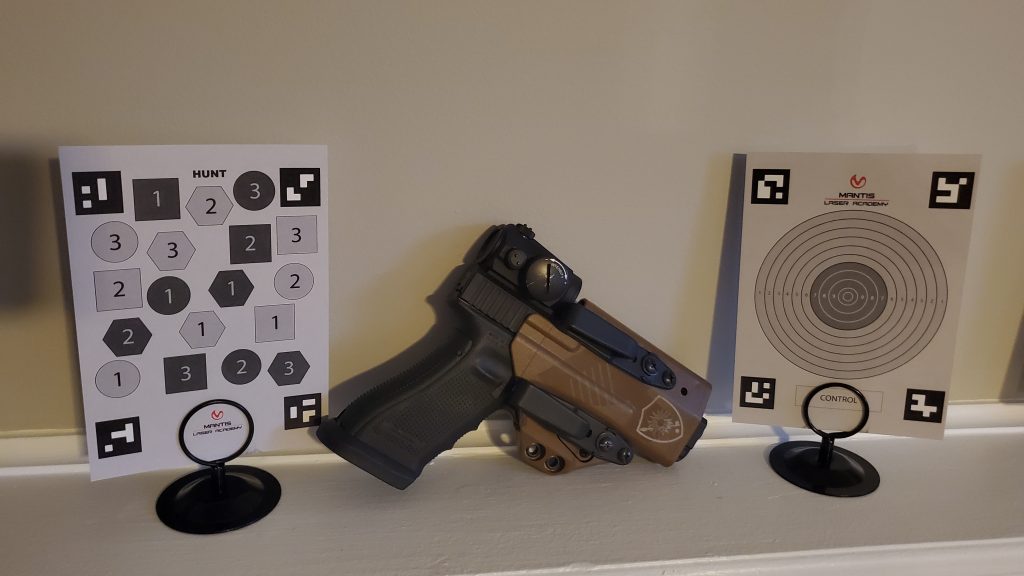
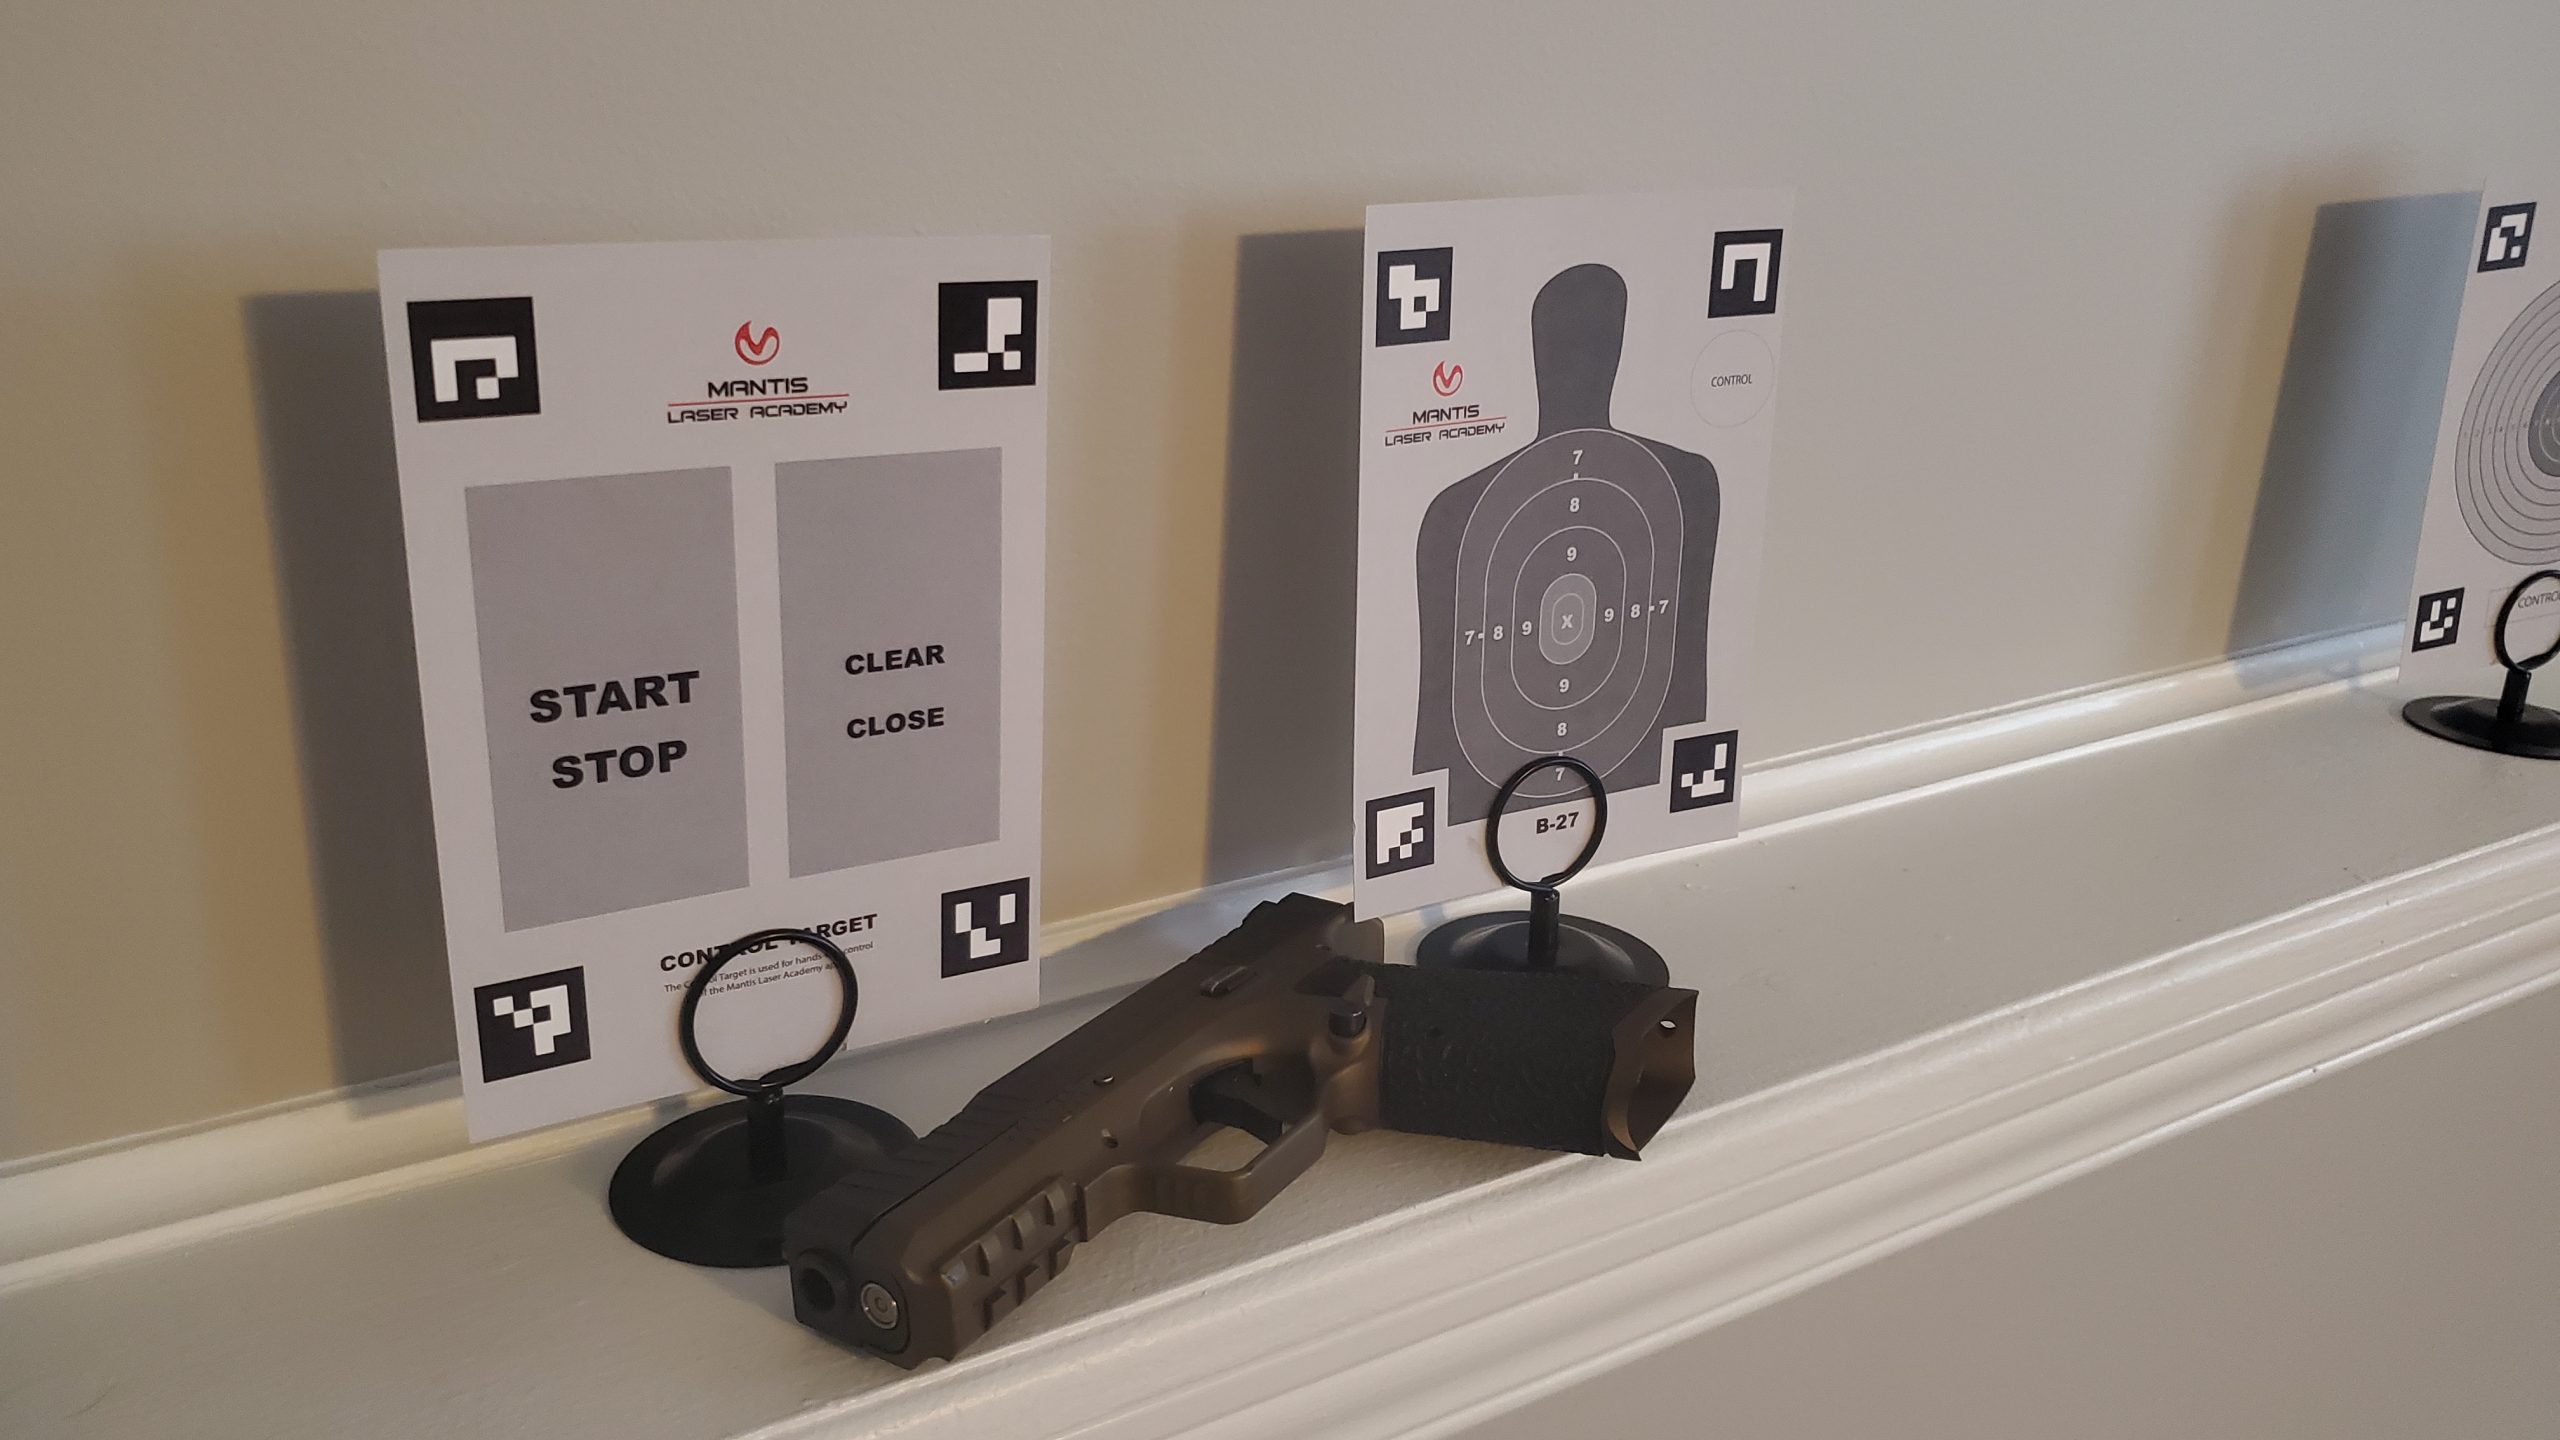
It’s a portable training kit from Mantis X with shooting drills and realtime feedback. The Mantis Laser Academy Kit uses a caliber-specific laser module for your pistols and rifles. This is then used with a series of smart target pages that the Laser Academy App can read and mark hits from the laser. Not only can the targets track your hits but one of them is even used as a remote so you have no need to touch your phone. You can start, stop, or clear your session by just firing at a target, which is pretty handy. If you are as stunned as I am you might end up forgetting to use the target to start things. However, the app still tracks your shots so consider it free target practice.
The Mantis Laser Academy Kit comes with a wooden dowel to easily pop out the caliber-specific laser cartridge.
Setup
Setting things up is extremely easy. The kit literally comes with everything you could need to start enhancing your dry fire in the house, or while you are on the road, for those who spend more time in hotels than their own beds. The Laser Academy app has numerous firing modes in it like Duels, Bullseye, Holster Draw, and many more. By purchasing the Standard Kit you get an unlock code that opens the PRO modes which also allows you to get future updates to it so if they make a new mode you get it. This is actually a fairly interesting option because custom drills and things can come at a later date or they can even partner with trainers to incorporate their own drill. If it uses a separate target you would just need the target and the system would then read it, allowing you to test your skills.
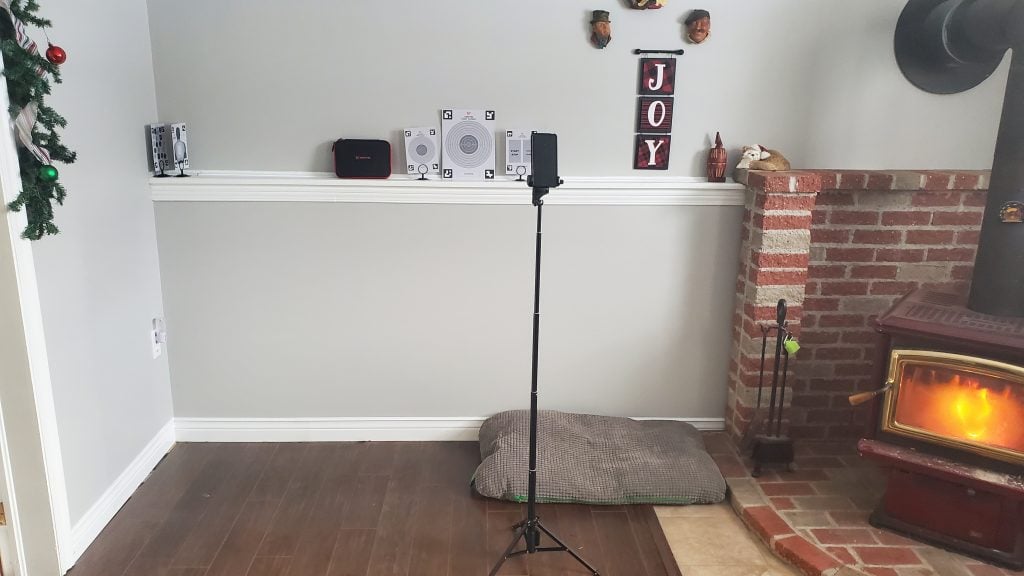
The way I normally shoot the Laser Academy in my basement using the tall stand and small targets. The larger target is shown for size.
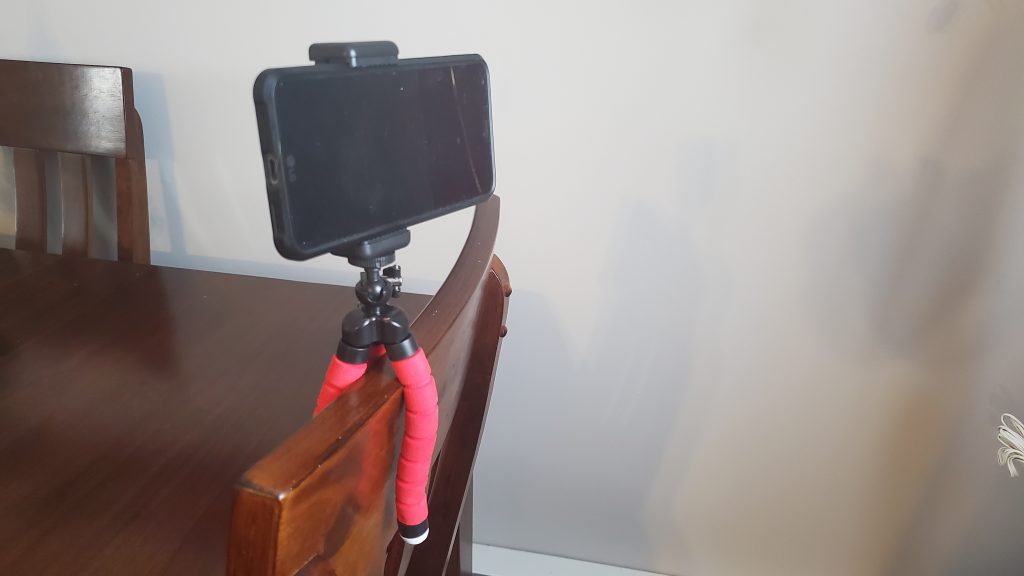
Depending on what you have around, the kit comes with two tripod options a small tabletop tripod with flexible legs and another one that gets up to about mid-chest. The flexible tripod can be bent around a chair top or used as a standard tripod on a desk or table depending on your room situation. At first, the tall tripod feels fairly flimsy since it’s so light in weight, but it doesn’t have to deal with wind and things. All it needs to do is hold your phone. The standard kit also comes with two different phone clamps to give you some versatility.
The tripod that comes in the kit has flexible legs, making it adaptable to even the weirdest of surfaces, like the back of this chair.
Once you have your phone in the clamp on a tripod and you downloaded the Laser Academy app you will need to insert the laser cartridge into the barrel of the firearm. Follow all your normal safety precautions and whatnot, rack the slide and lock it back, pop the cartridge in and release the slide lock. Look through the app and figure out what drill you want to do. The app will tell you what type of target you will need to use.
The Laser Academy app that you can get on IOS and Android reads the QR codes in the corner of the targets to tell the system the size of the target and where you hit.
Speaking of targets you get two sizes of each 5″x7″ and 8.5″x11″ which can either be used to make things easier to see or be used based on space 2 yards vs 4 yards. The larger targets you stick to the wall using the included blue tack and the smaller ones you can do the same or use the included target stands. For my situation, I have found the smaller 5″x7″ targets to be the perfect option and have shot them from as far away as 10m in my basement because I could. The keyring style clamp on the target stands can be a bit stiff and it helps if you help pop them open a bit with a fingernail first so you don’t end up mangling your target cards.
The score screen on the Mantis Laser Academy lets you know where you hit and your times.
Now you just aim the phone camera at the target and you will notice a box appear around the targets. This happens because it reads the four coded squares in the corner of the target telling it what target it is and sizing it for the app. Using all this data it knows where all the scoring zones are on the target and how big they actually are.
Thoughts From Use
I have had this kit for around a month now. I’ve used it a fair amount, playing with the different targets and modes and getting a feel for everything it can do and for features I hope will be added at a later time.
First things first, I have found the accuracy of the camera to be exceptionally precise, picking up the laser at the exact point on the target. While my wife was shooting, I looked very closely at the target and then checked the phone. The shot was appropriately placed on the screen and scored accordingly.
There are a few suggestions I have for making the system a little more efficient, though. Being as this is just a cartridge in the barrel it won’t reset the trigger so unless you have a double-action pistol you will need to partially rack the slide to reset the trigger in order to shoot again. Something like one of the CO2 replacement barrels from CoolFire would really amp up some of the training that could be done with the kit.
I also have an idea for a training program for the Dot Torture test targets. I think it would be cool if it randomly called out a target by saying, “One,” or “Grey Square Two”. This would assess your time in target recognition and drawing from a holster. This kind of program could also be done with the silhouette targets where it calls out the target name and says, “Two shots,” or something like that.
The Laser Academy has holster draw drills in it which is great if your range is sad and won’t let you draw and shoot from a holster. It also works if you live in Hoth like some of us and don’t want to freeze.
The other area I see this potentially being useful would be with something like an Indoor Dryfire Training System and a bolt action-specific caliber. You could have Know Your Limits type targets or even have PRS style targets setups.
This brings me to my next point about the app. It allows you to set an offset. This comes in handy in case, say, your red dot on your pistol is zeroed far enough away that the close distance in your house causes you to aim off-center on the target.
What they don’t have or that I can’t see is firearm profiles. So say you have a Glock with a red dot and a P320 with iron,s you don’t have to adjust this each time. The range I belong to does not allow holsters, so I can’t practice drawing and firing from a holster there. With the Laser Academy, I can do this whenever I want at home.
Results with the Mantis Laser Academy
I have noticed a tremendous increase in my draw and fire times. With my Glock that has an Aimpoint H1 on it, I am getting way faster at getting the dot on the target and firing a shot. Sadly I recently traded this pistol and need to get my other Archon slide milled for a red dot but you get the idea. The system has loads of potential, especially for new shooters or people who are a bit iffy on firearms. There are no loud sounds or recoil, so they can focus on learning the fundamentals in a familiar place. And, to be honest, it’s just fun—kind of like an arcade game.
Mantis Laser Academy and Archon Type B on the half wall in basement.
*Update This article hasn’t even been posted and there is already an update with Hunt Drills. It has Easy Medium and Hard. On hard, it will call out shade so Light Square 1 which is awesome and is fairly tricky.
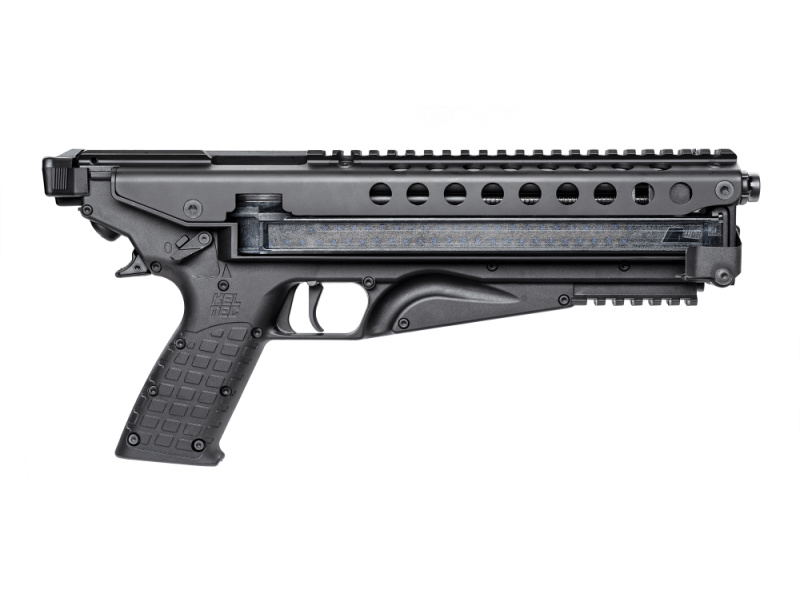
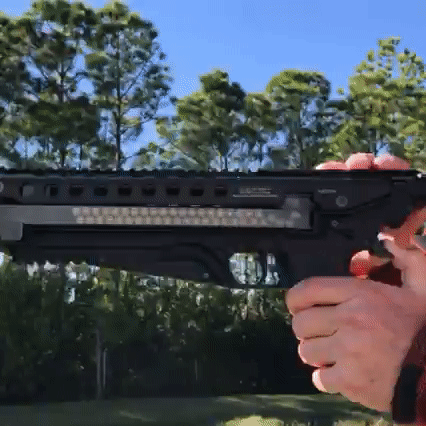
It’s rare to see anything truly unique in the handgun world, so it’s interesting to check out the KelTec P50, which really is a different kind of gun. In this video review, YouTuber Caleb Downing tries it out for himself and gives you his take on its design and overall performance. Haven’t heard of the KelTec P50? Check this out. We think you’ll end up wanting a closer look.
Caleb Downing takes a look at the KelTec P50. (Photo credit: Caleb Downing)
What is the KelTec P50?
The KelTec P50 is a handgun chambered in 5.7x28mm. This description makes it sound basic, but it is anything but basic. It has what the manufacturer calls a “retro” appearance and is bulkier than traditional handguns. The P50 is a handgun you’re not likely to want to shoot one-handed, and you’re definitely going to want some trigger time with it.
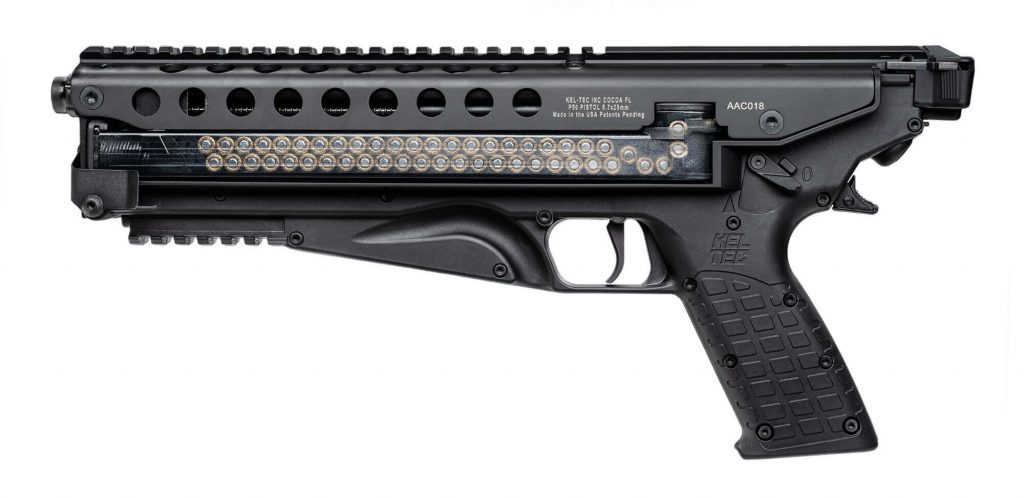
The KelTec P50 is a unique handgun, as you can see by the way the magazine is inserted. (Photo credit: KelTec)
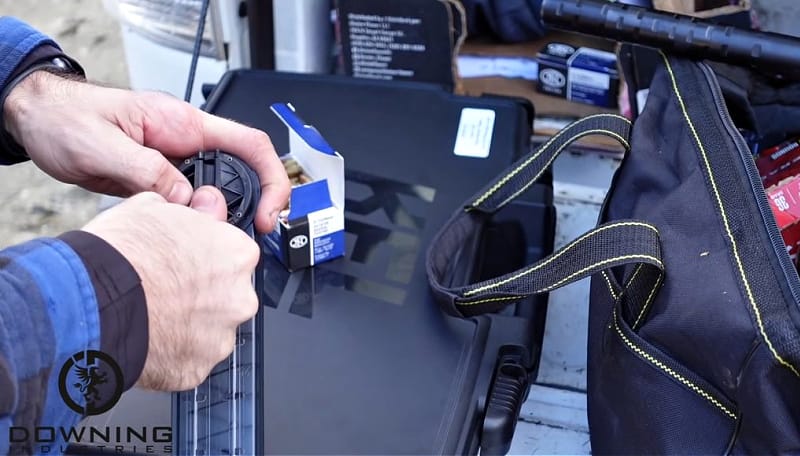
Downing runs through some live fire with the P50, which he calls a “space gun” (understandably). This all has to start with loading the magazine, which is probably the gun’s most unique feature. It’s a 50-round FN PS90/P90 magazine and is loaded into the gun’s frame horizontally.
Source: KelTec
Loading it with rounds of ammunition is an interesting feat that involves getting the hang of using the base of one round to press the nose of the bullet of the previous round downward and to the side, allowing it to rotate into place. According to Downing, there is a speed loader available and it looks like it would be a good idea to use one.
Magazines for the P50 don’t load from the top like a standard handgun magazine. Using a speedloader makes things a lot easier with this design. (Photo credit: Caleb Downing)
As for performance, the first round through Downing’s review gun failed to eject, but after that, it appears to have cycled reliably. He also discovered during his time running the handgun that it will fire a chambered round with the magazine out of the gun, which is nice to know. Overall it looked like he had fun with it.
Interested in finding out more about the P50 and seeing Downing load that magazine himself? Check out the video:
What’s the Purpose of the P50?
The first use for the P50 is to have fun plinking with it. It is, after all, a cool gun. In this caliber, it could be used to handgun hunt varmints and pests, and there are those who would probably consider using it for some form of home defense. Overall this is one of those guns that’s just fun to own and a joy to shoot, and there is nothing wrong with that.
YouTuber Nickademus77 mentioned some other simple purposes for the KelTec P50 in the comment section for this video, including:
Home defense when the number of invaders and overpenetration are a concern.
Secondary sidearm. ‘Perfect pair’ for the PS90/P90.
Would you want a KelTec P50 of your own? Why or why not? Let us know what you think in the comments section below.